> ## Documentation Index
> Fetch the complete documentation index at: https://docs.guidelypro.ai/llms.txt
> Use this file to discover all available pages before exploring further.

# WooCommerce: Connect Your Store

> Start building awesome a conversion engine for your e-commerce store in minutes.

## Integrate your WooCommerce store with GuidelyPro.AI — connect your catalog, publish a guided experience, and activate it on your storefront with a lightweight WordPress plugin.

***

<Info>
  **Before you start** — you need a GuidelyPro.AI account, admin access to your WordPress store, and your WordPress/WooCommerce store URL. That's it.
</Info>

Prefer to watch? Click through the interactive walkthrough

<video controls className="w-full aspect-video rounded-xl" src="https://guidelypro.ai/videos/Mintlify/Connect_WooCommerce_to_GuidelyProAI_and_Activate_the_Storefront_Chatbot_1080p_v1.0.mp4" />

***

## Part 1 — Connect your WooCommerce store

<Steps>
  <Step title="Add an integration">
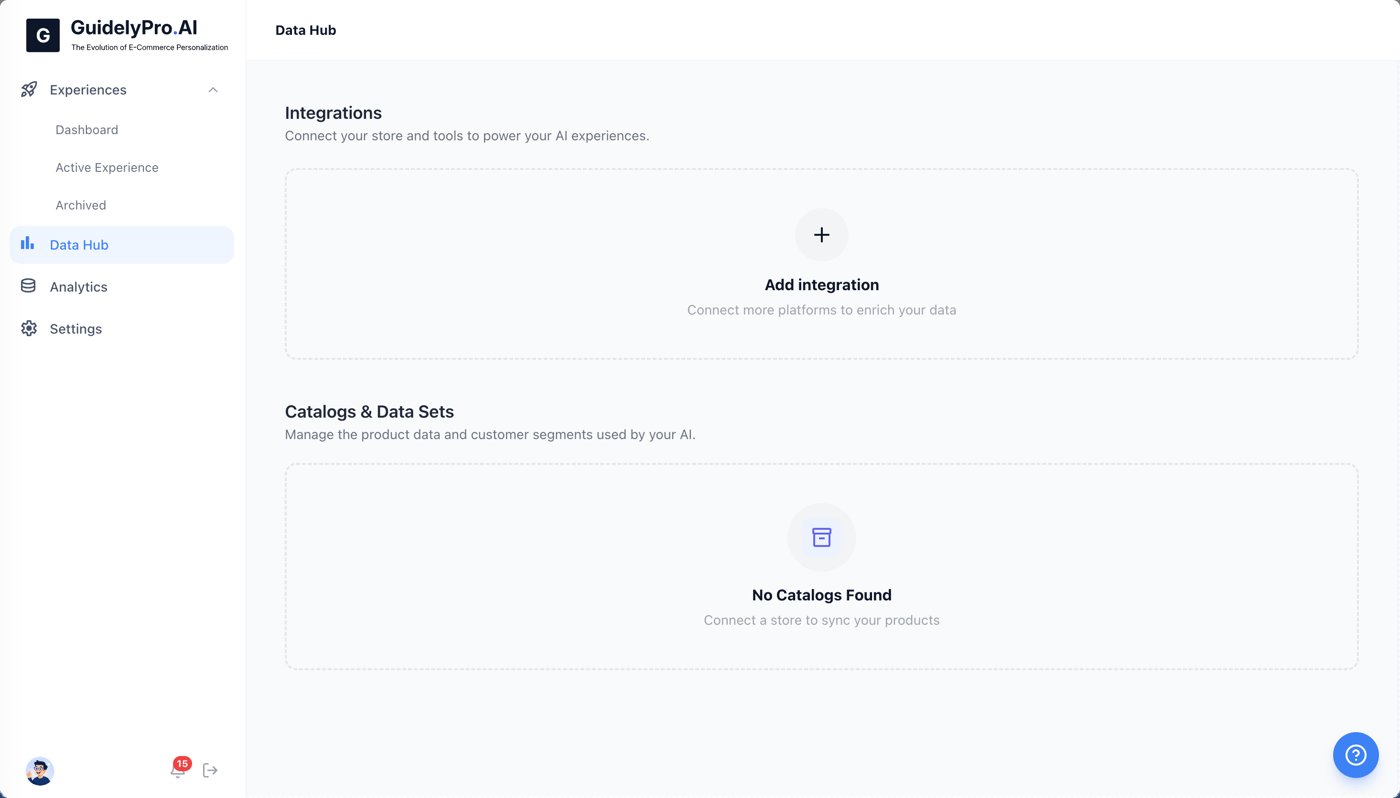
    In the **Data Hub**, select **Add integration** to start linking your WooCommerce store.
    <Frame>
      <img src="https://mintcdn.com/guidelypro/2Ap_uLDelKFaSwXK/images/step-01.png?fit=max&auto=format&n=2Ap_uLDelKFaSwXK&q=85&s=8727500bc4b44592a6ca3fd47406faf3" alt="Step 01" width="1400" height="798" data-path="images/step-01.png" />
    </Frame>
  </Step>

  <Step title="Choose WooCommerce">
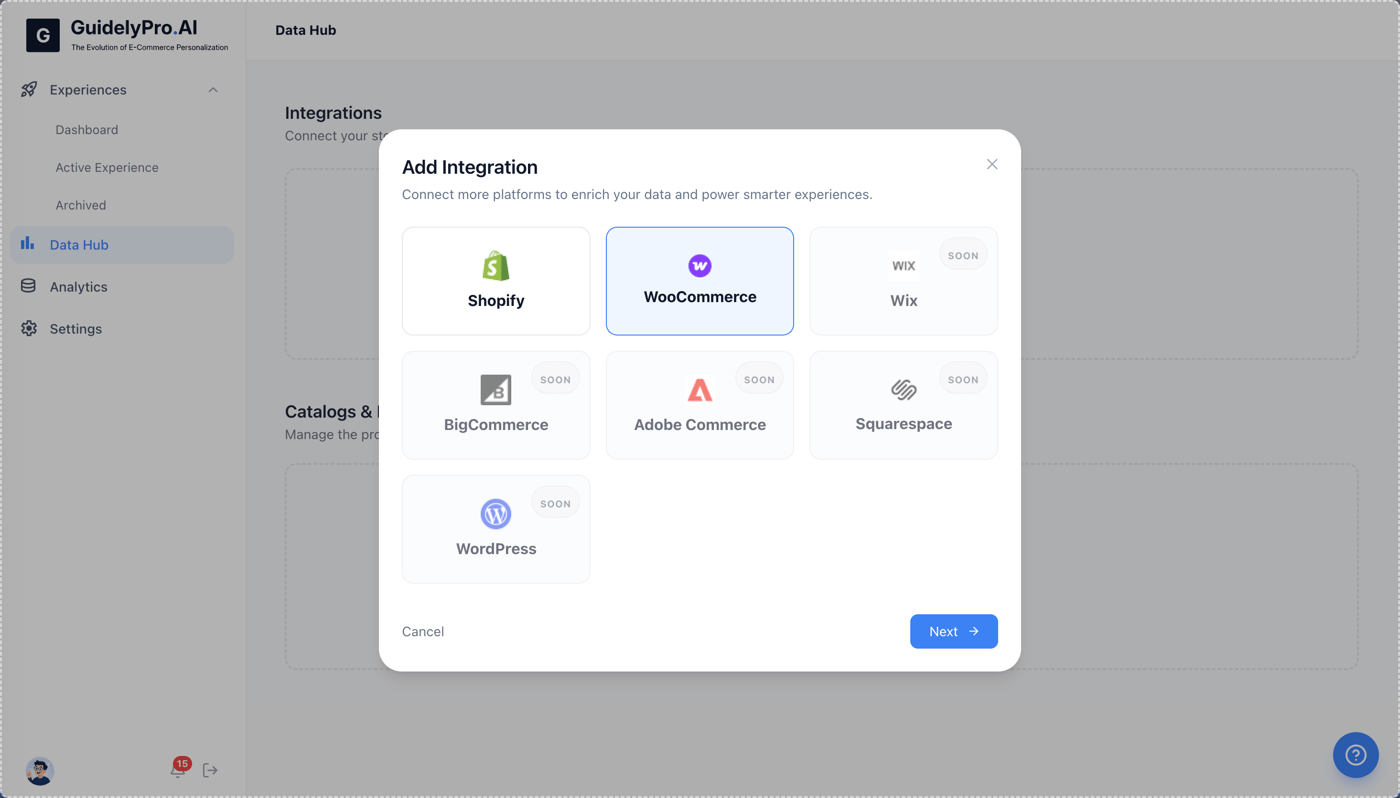
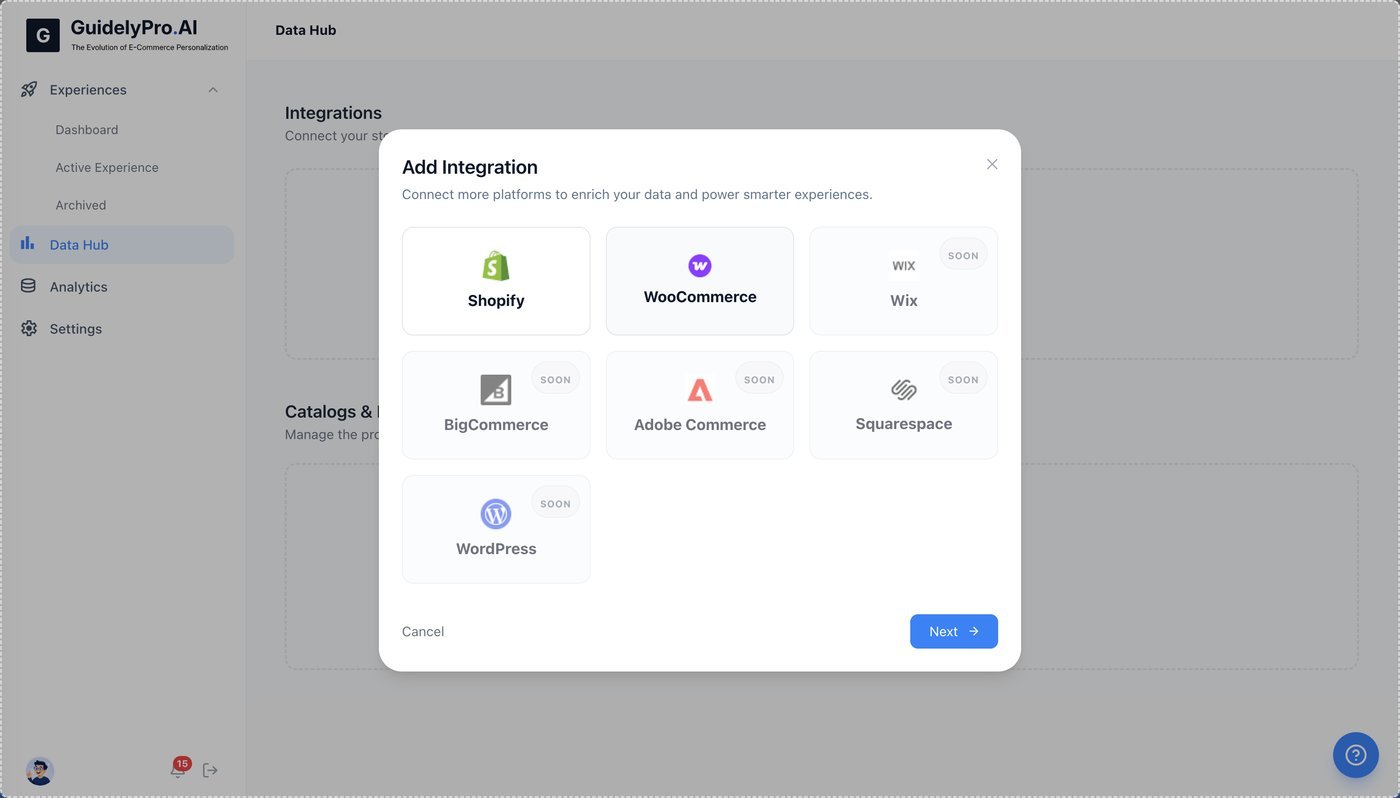
    Choose **WooCommerce** from the list of available integrations.
    <Frame>
      <img src="https://mintcdn.com/guidelypro/2Ap_uLDelKFaSwXK/images/step-02-2.jpg?fit=max&auto=format&n=2Ap_uLDelKFaSwXK&q=85&s=d06dea623dac8a0ac4129285d628e334" alt="Step 02 2" width="1400" height="798" data-path="images/step-02-2.jpg" />
    </Frame>
  </Step>

  <Step title="Continue">
    Click **Next** to proceed.

    <Frame>
      <img src="https://mintcdn.com/guidelypro/2Ap_uLDelKFaSwXK/images/step-03.png?fit=max&auto=format&n=2Ap_uLDelKFaSwXK&q=85&s=fd131c6b7f8a5bf1561203df10150b0d" alt="Step 03" width="1400" height="798" data-path="images/step-03.png" />
    </Frame>
  </Step>

  <Step title="Enter your store URL">
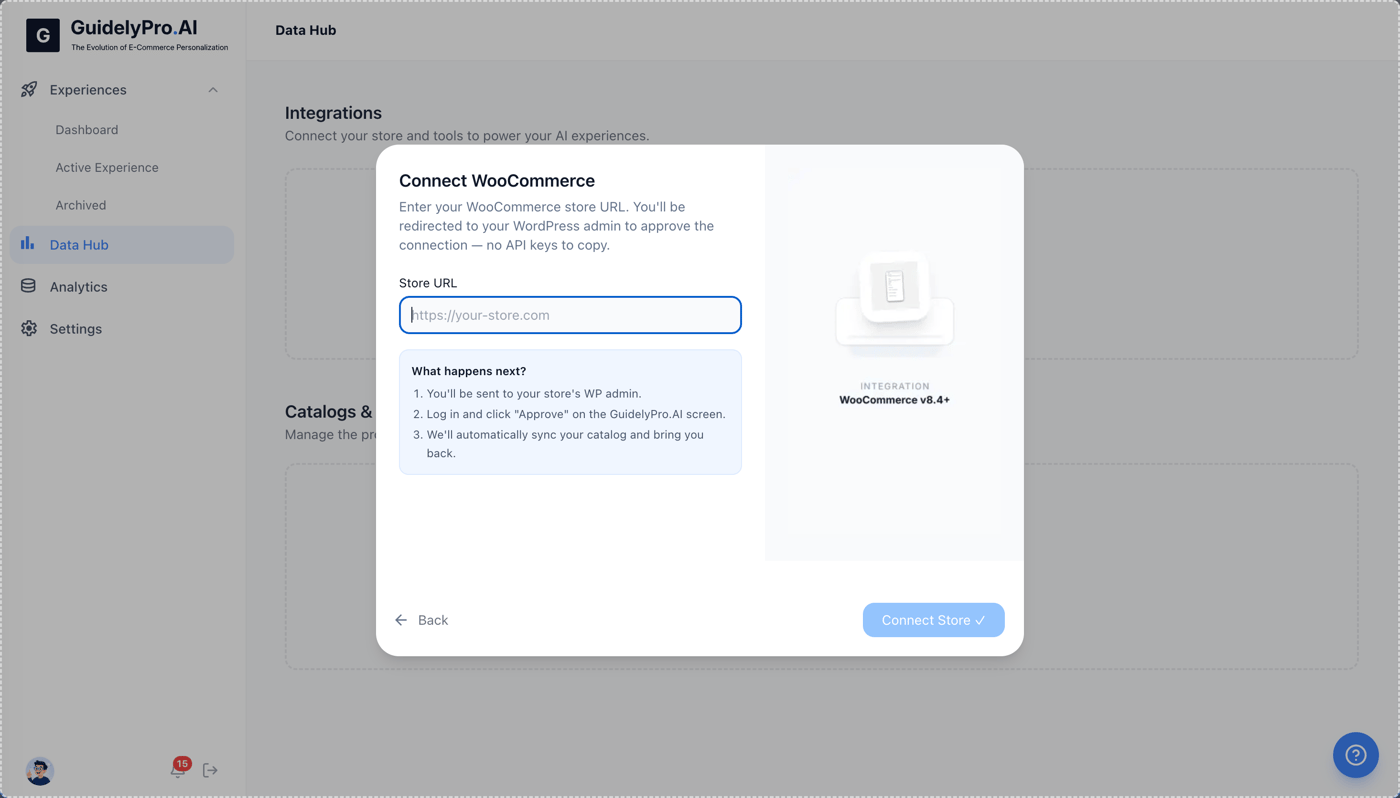
    Enter your WooCommerce store URL to begin the connection process.
    <Frame>
      <img src="https://mintcdn.com/guidelypro/2Ap_uLDelKFaSwXK/images/step-04.png?fit=max&auto=format&n=2Ap_uLDelKFaSwXK&q=85&s=2f54b48ac4fdcc91d2625e651745ad77" alt="Step 04" width="1400" height="798" data-path="images/step-04.png" />
    </Frame>
  </Step>

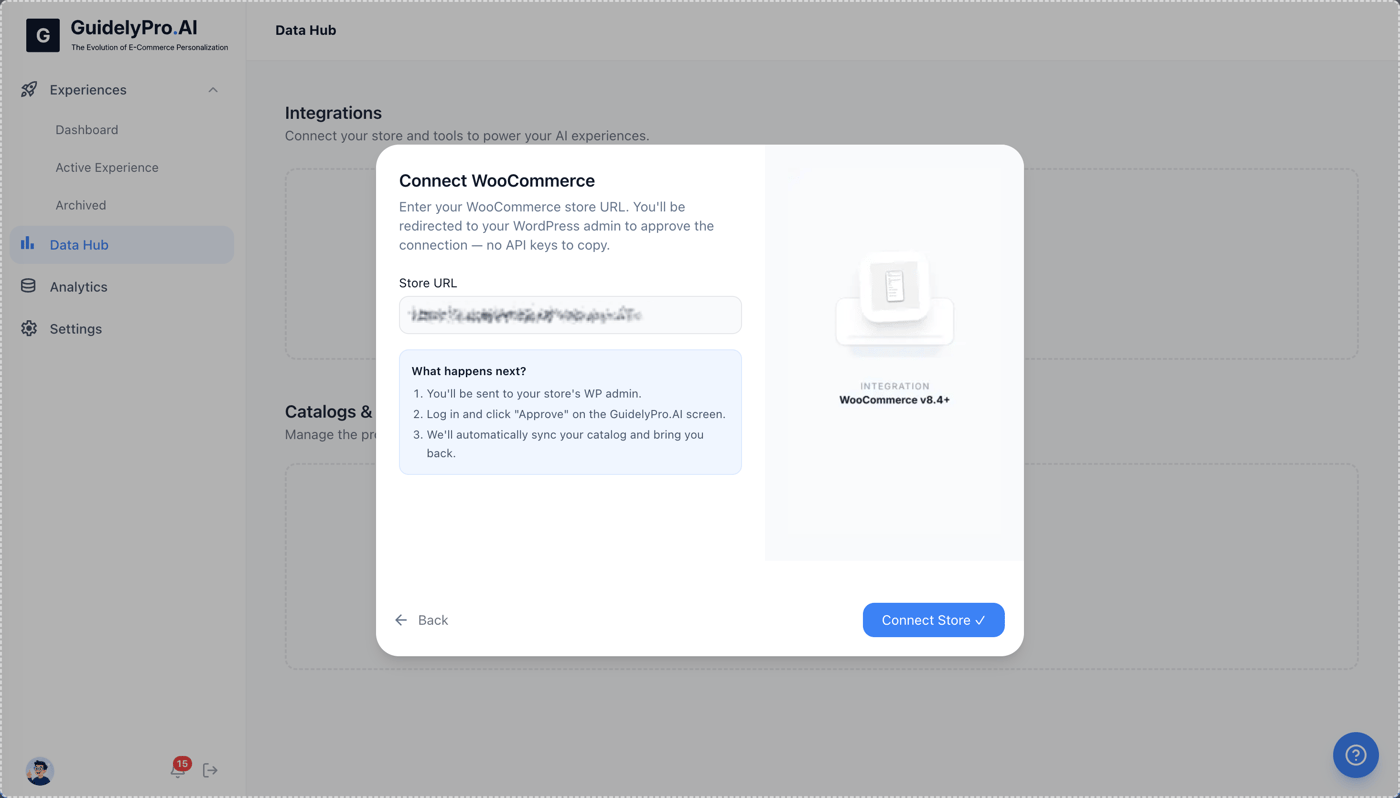
  <Step title="Connect the store">
    Click **Connect Store** to initiate linking your WooCommerce shop.
    <Frame>
      <img src="https://mintcdn.com/guidelypro/2Ap_uLDelKFaSwXK/images/step-05.png?fit=max&auto=format&n=2Ap_uLDelKFaSwXK&q=85&s=6d9dc9b529634db8ede59f6341e5268f" alt="Step 05" width="1400" height="798" data-path="images/step-05.png" />
    </Frame>
  </Step>

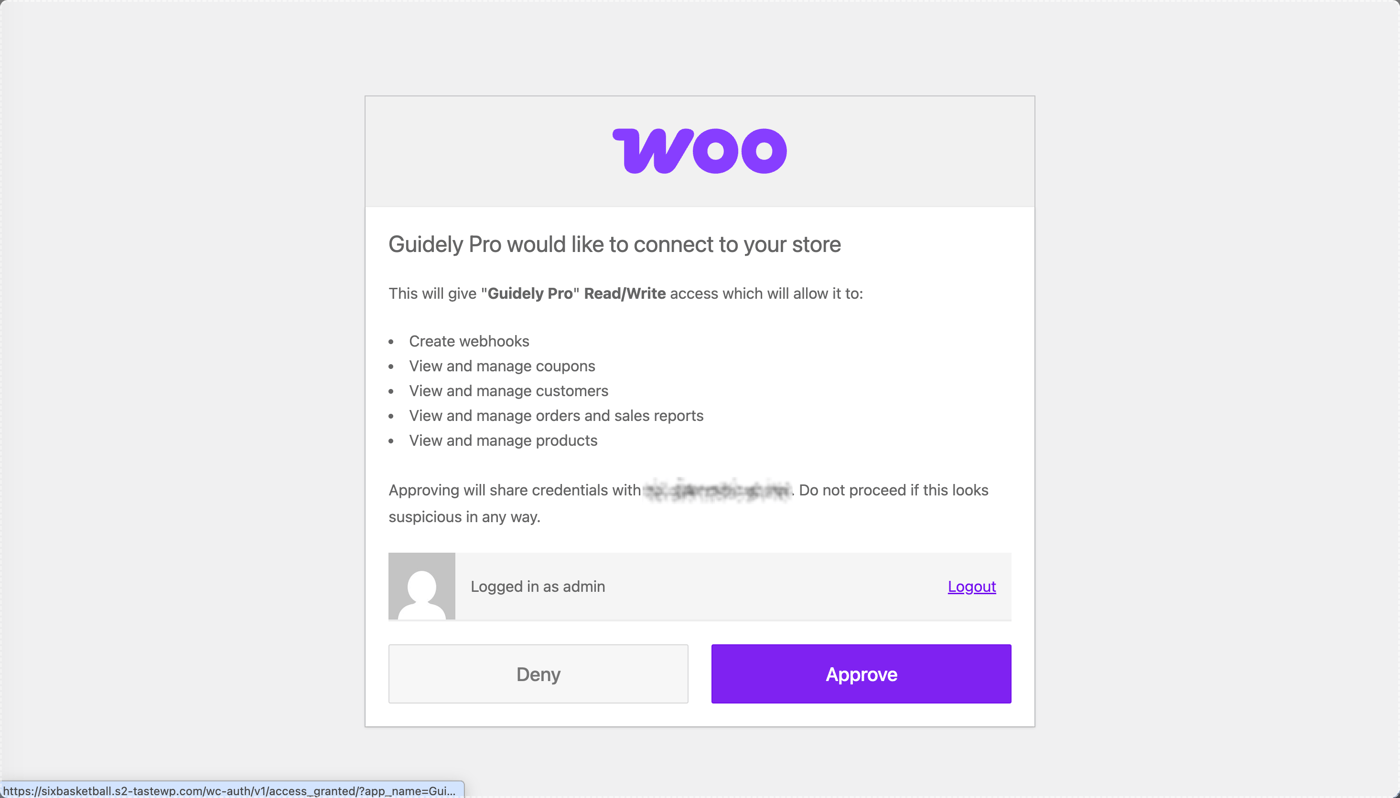
  <Step title="Approve permissions">
    Approve the permissions request to allow GuidelyPro.AI access to your WooCommerce store data.
    <Frame>
      <img src="https://mintcdn.com/guidelypro/2Ap_uLDelKFaSwXK/images/step-06.png?fit=max&auto=format&n=2Ap_uLDelKFaSwXK&q=85&s=4bb7fafa29f86196bb73d7d0749c4a0f" alt="Step 06" width="1400" height="798" data-path="images/step-06.png" />
    </Frame>
  </Step>
</Steps>

## Part 2 — Create and publish an experience

<Steps>
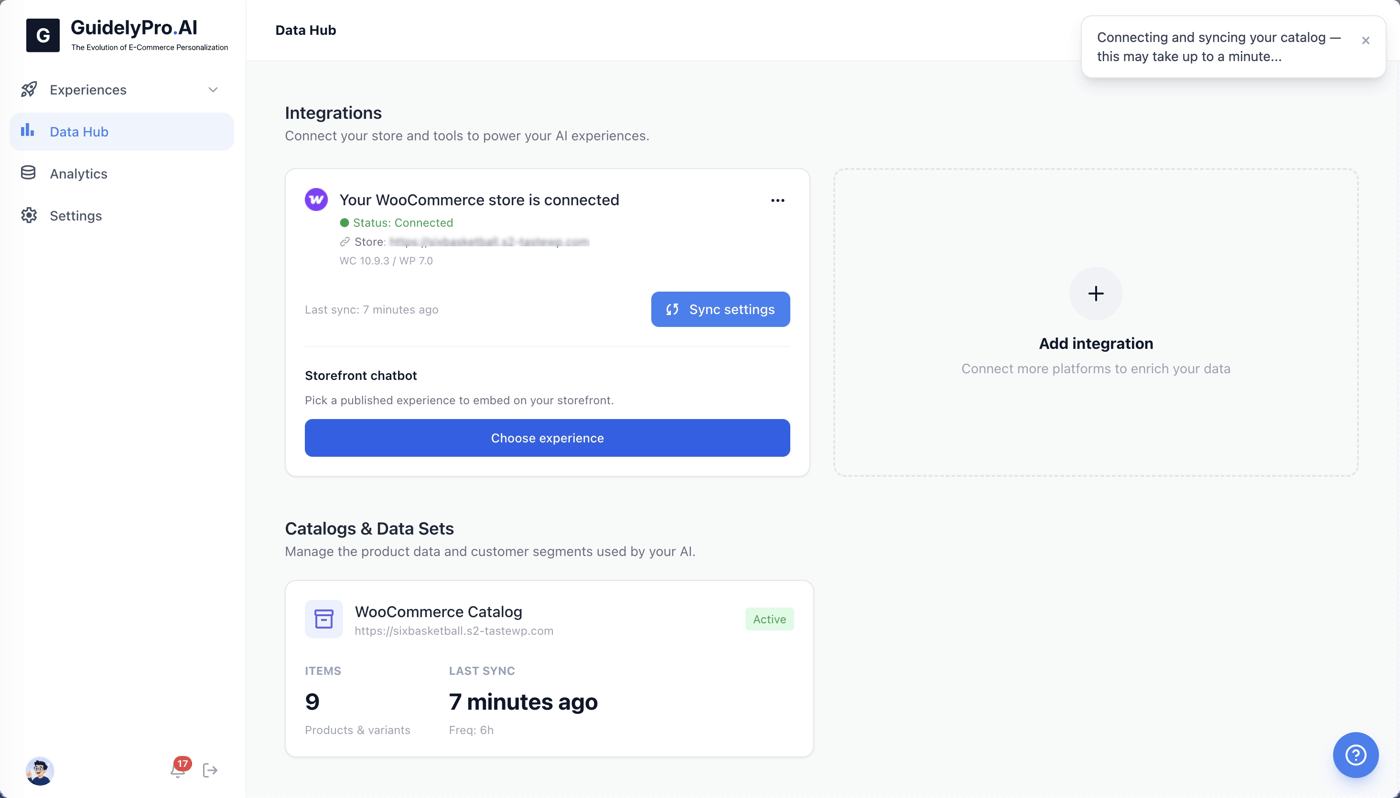
  <Step title="Choose an experience">
    To enable an experience, click **Choose experience**.
    <Frame>
      <img src="https://mintcdn.com/guidelypro/2Ap_uLDelKFaSwXK/images/step-07.png?fit=max&auto=format&n=2Ap_uLDelKFaSwXK&q=85&s=1627456358664346234f0181b05bf904" alt="Step 07" width="1400" height="798" data-path="images/step-07.png" />
    </Frame>
  </Step>

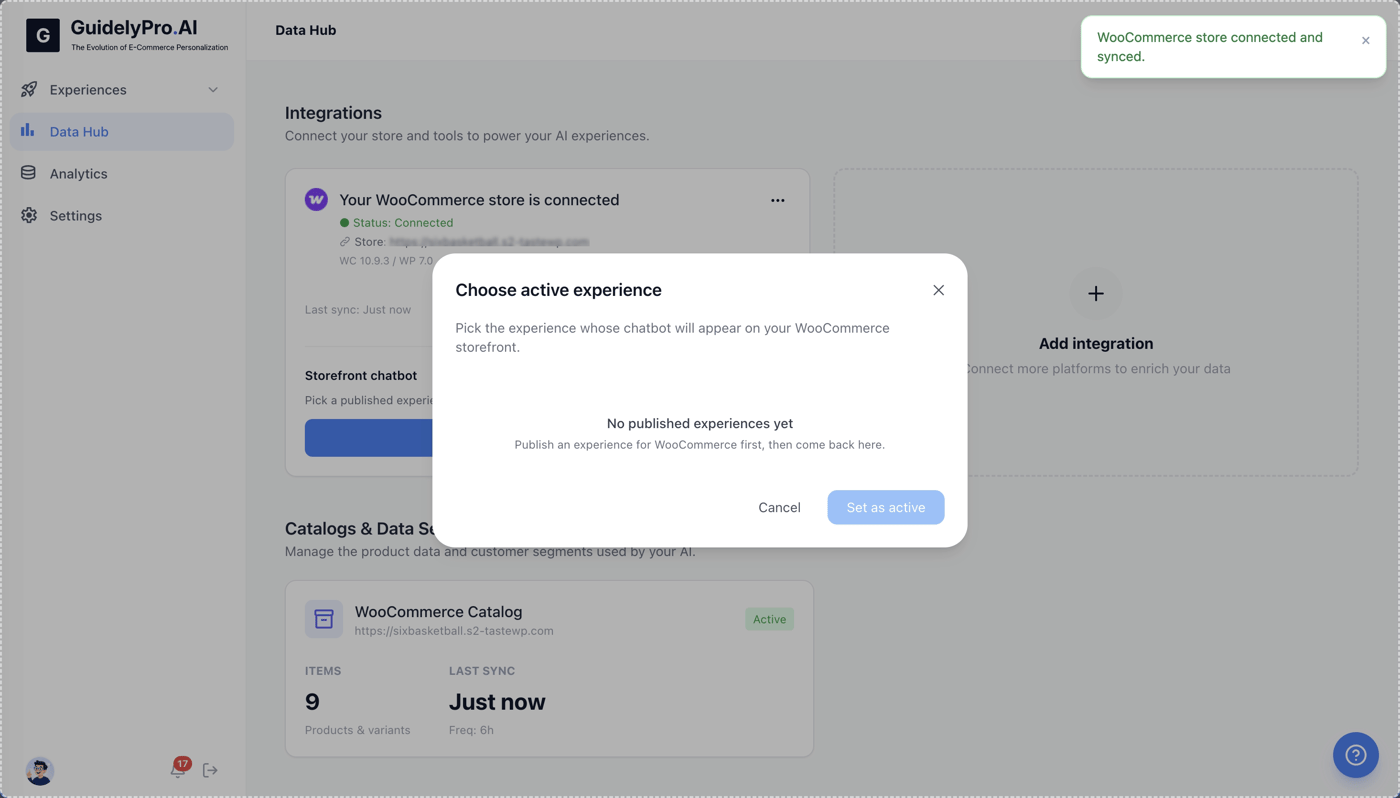
  <Step title="No experience yet? Close the popup">
    Close this popup if you don't have an active experience to assign yet — you'll create one now.
    <Frame>
      <img src="https://mintcdn.com/guidelypro/2Ap_uLDelKFaSwXK/images/step-08.png?fit=max&auto=format&n=2Ap_uLDelKFaSwXK&q=85&s=3a9d1254836dc8ab931cb085e2cf0151" alt="Step 08" width="1400" height="798" data-path="images/step-08.png" />
    </Frame>
  </Step>

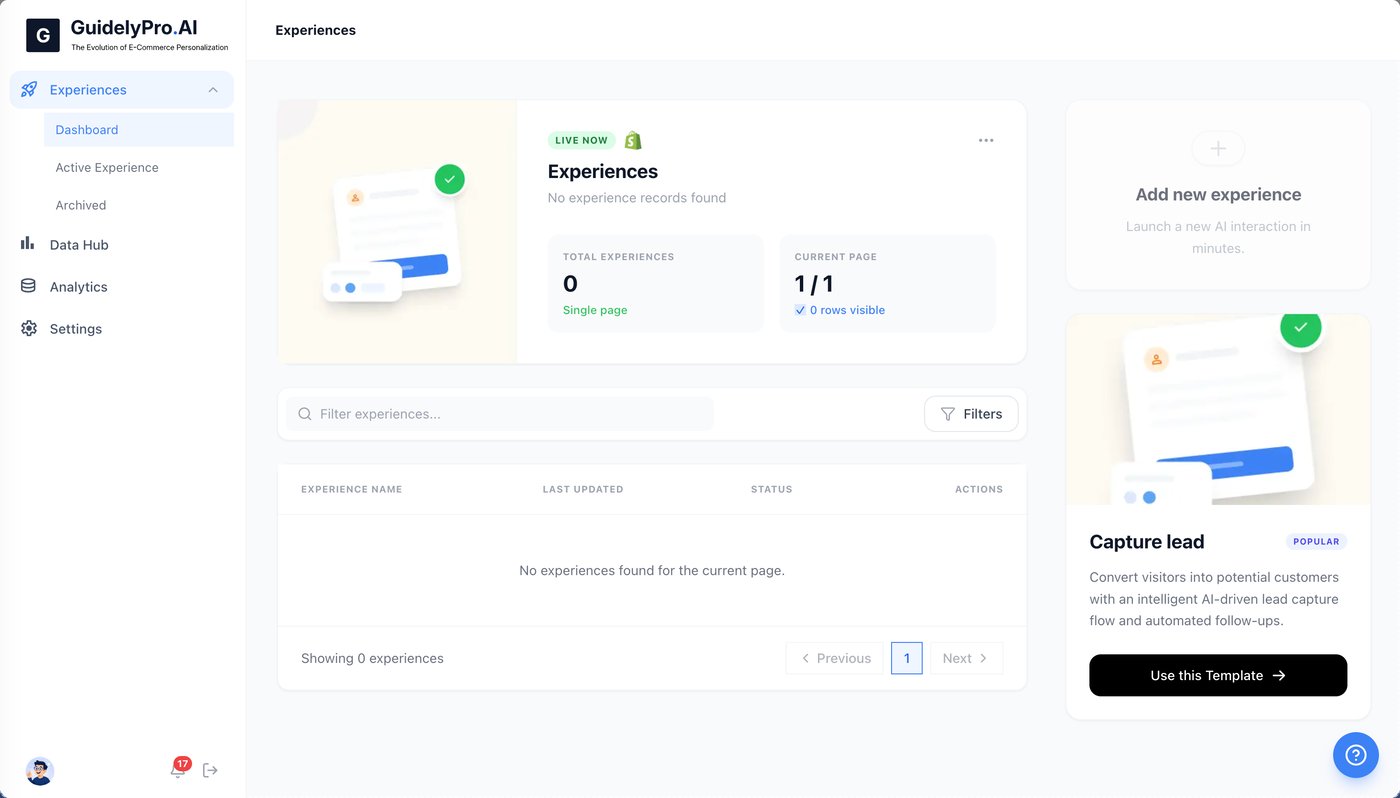
  <Step title="Start from a template">
    Use a pre-built template like **Capture lead** to quickly set up a new experience.
    <Frame>
      <img src="https://mintcdn.com/guidelypro/2Ap_uLDelKFaSwXK/images/step-09-2.jpg?fit=max&auto=format&n=2Ap_uLDelKFaSwXK&q=85&s=2b32a262ef7f35a566410ff8c875c855" alt="Step 09 2" width="1400" height="798" data-path="images/step-09-2.jpg" />
    </Frame>
  </Step>

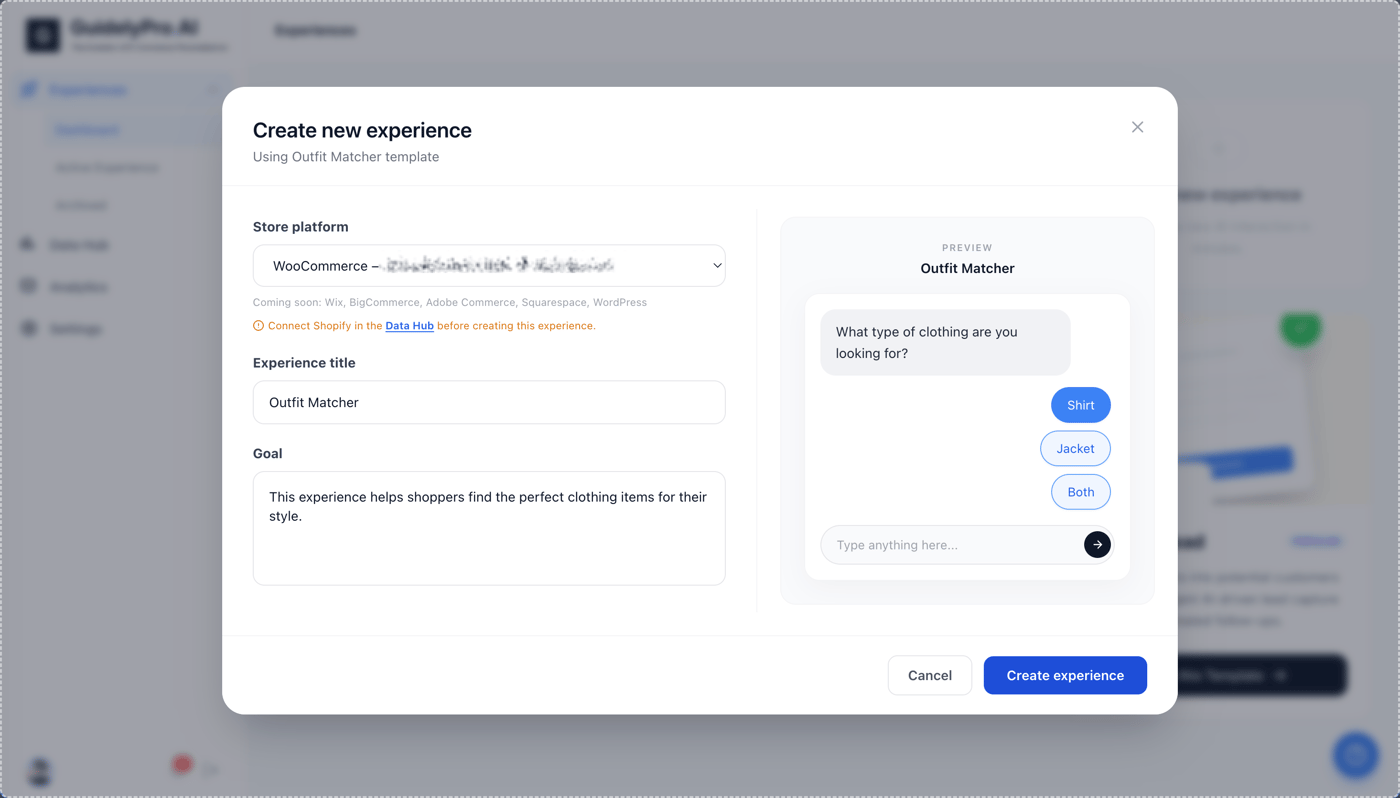
  <Step title="Create the experience">
    Click **Create experience** to save and finalize your new experience.
    <Frame>
      <img src="https://mintcdn.com/guidelypro/2Ap_uLDelKFaSwXK/images/step-10-1.png?fit=max&auto=format&n=2Ap_uLDelKFaSwXK&q=85&s=bfb777bf643cd7782c341e2ecb59709b" alt="Step 10 1" width="1400" height="798" data-path="images/step-10-1.png" />
    </Frame>
  </Step>

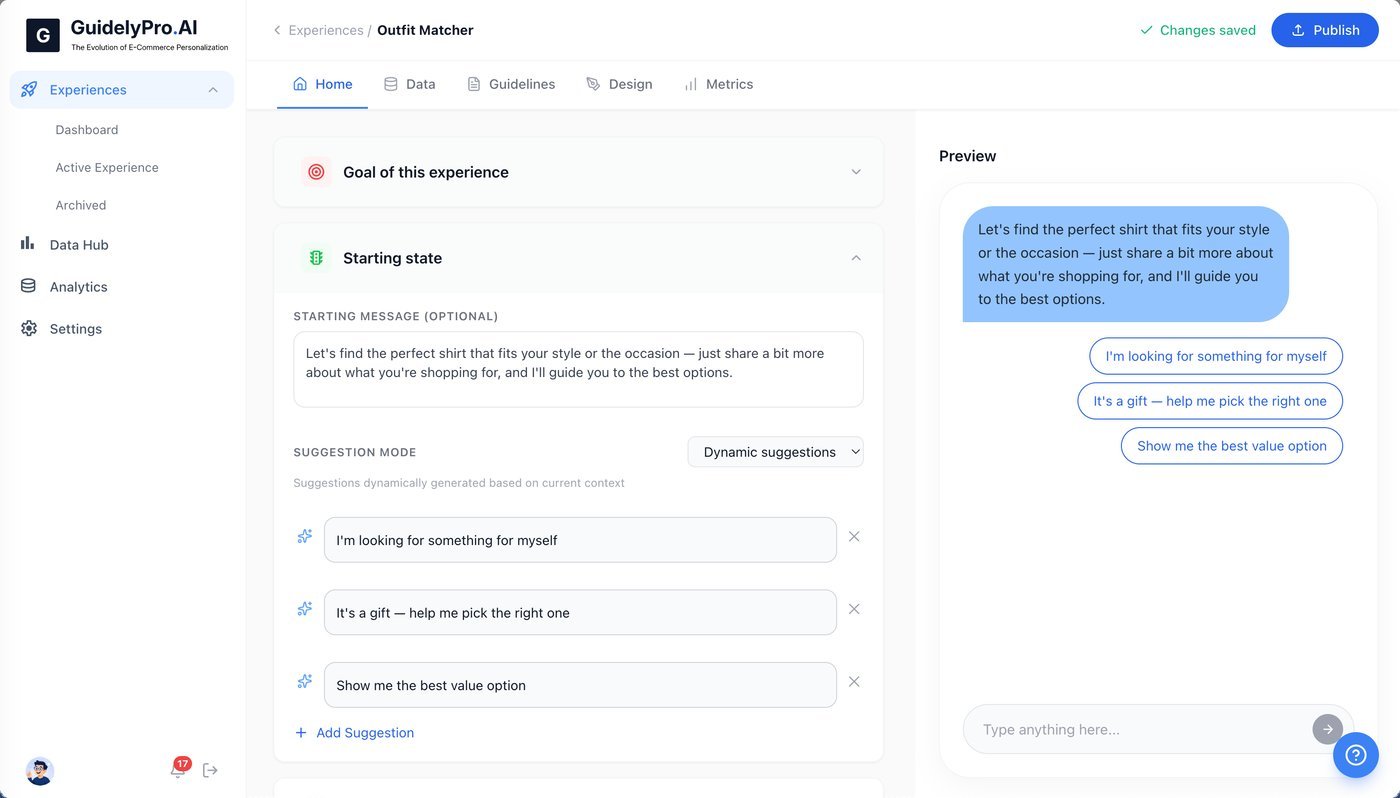
  <Step title="Publish">
    Publish the experience to make it live on your storefront.
    <Frame>
      <img src="https://mintcdn.com/guidelypro/2Ap_uLDelKFaSwXK/images/step-11.jpg?fit=max&auto=format&n=2Ap_uLDelKFaSwXK&q=85&s=bf866123aaf8027042e045923de5515c" alt="Step 11" width="1400" height="798" data-path="images/step-11.jpg" />
    </Frame>
  </Step>

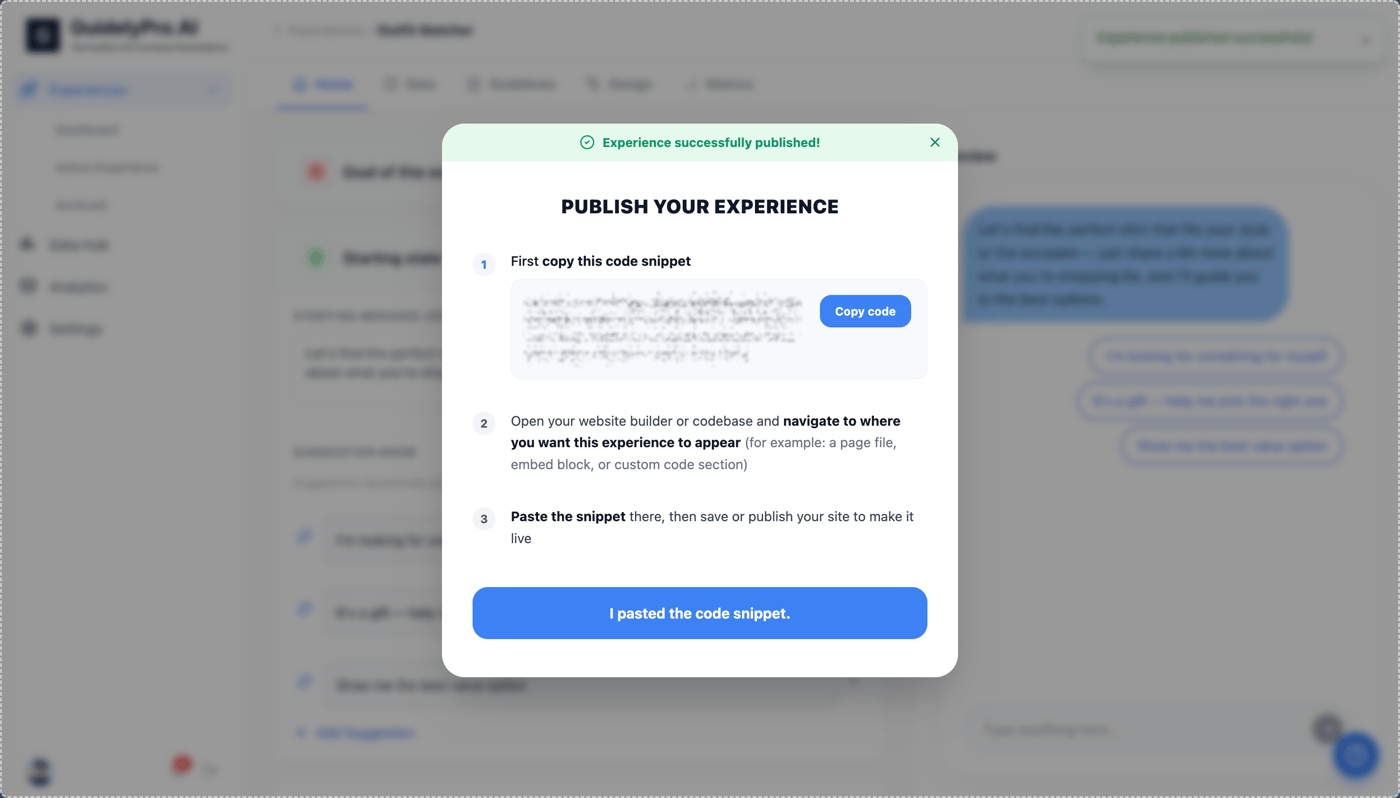
  <Step title="Dismiss the modal">
    Dismiss the modal once you've published.
    <Frame>
      <img src="https://mintcdn.com/guidelypro/2Ap_uLDelKFaSwXK/images/step-12.png?fit=max&auto=format&n=2Ap_uLDelKFaSwXK&q=85&s=7cc8ae81b1cd9205b6e3b1207a7b4d8a" alt="Step 12" width="1400" height="798" data-path="images/step-12.png" />
    </Frame>
  </Step>
</Steps>

## Part 3 — Assign the experience to your store

<Steps>
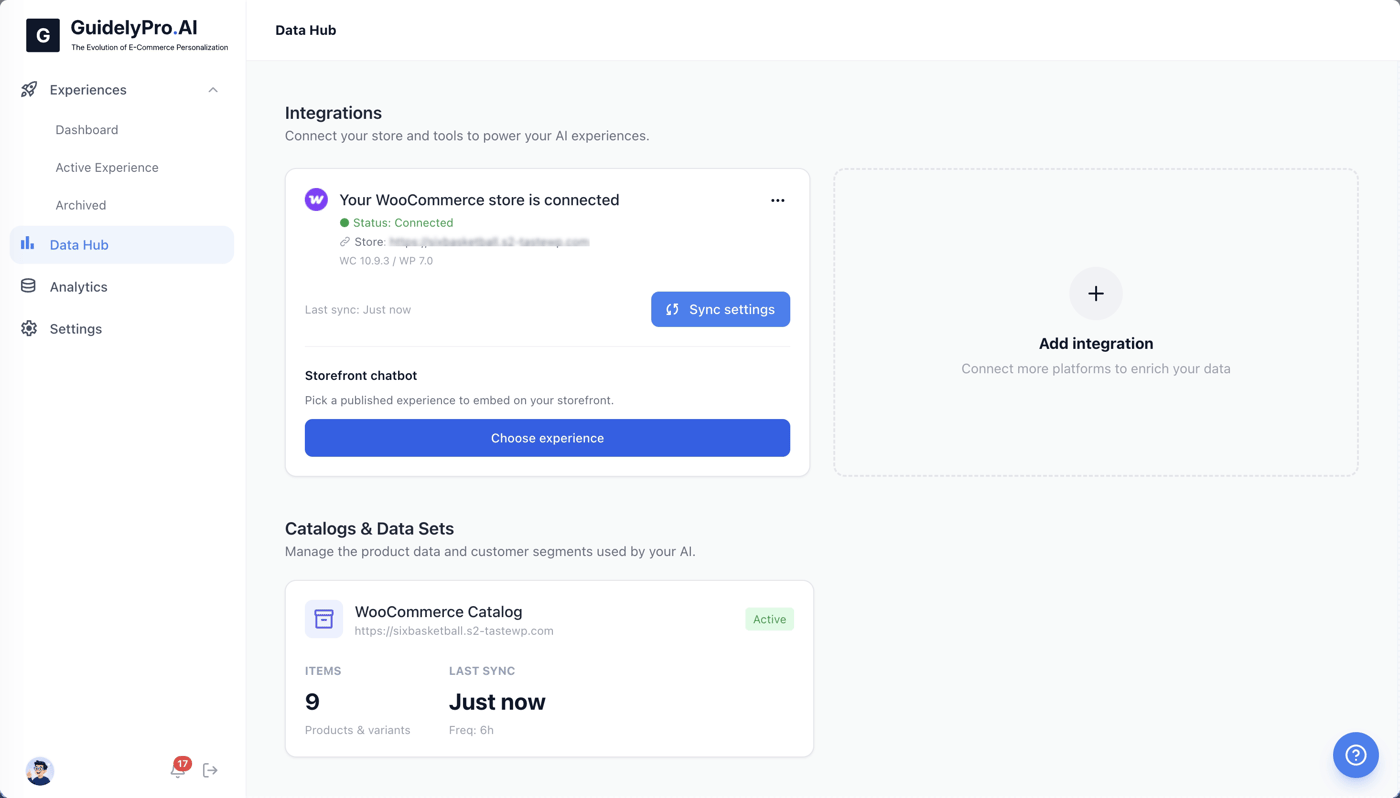
  <Step title="Return to the Data Hub">
    Return to the **Data Hub** to continue managing integrations.
    <Frame>
      <img src="https://mintcdn.com/guidelypro/2Ap_uLDelKFaSwXK/images/step-14.png?fit=max&auto=format&n=2Ap_uLDelKFaSwXK&q=85&s=8f0e2a61db50a9e17fa4dda288f74099" alt="Step 14" width="1400" height="798" data-path="images/step-14.png" />
    </Frame>
  </Step>

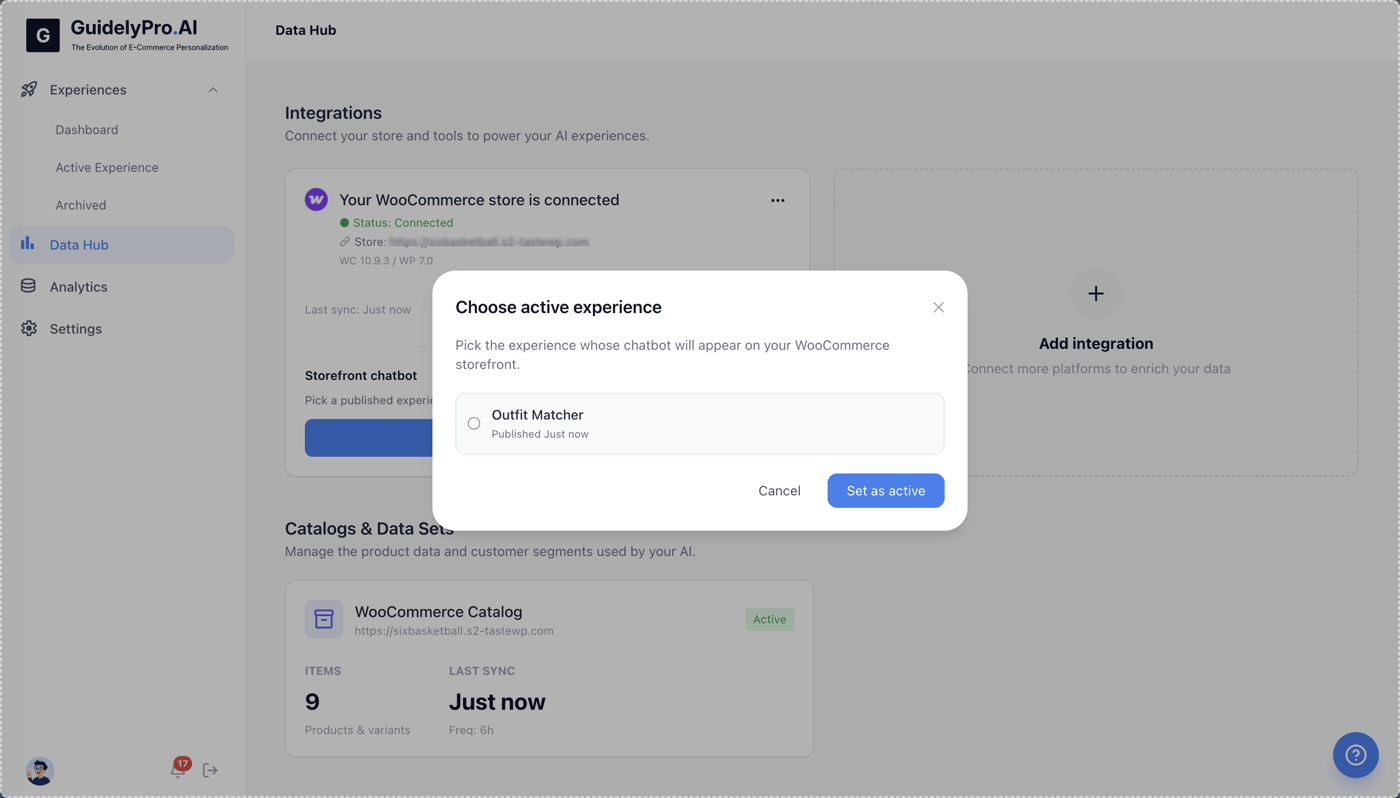
  <Step title="Choose the experience">
    Click **Choose experience** below your connected WooCommerce store to assign a published experience.
    <Frame>
      <img src="https://mintcdn.com/guidelypro/2Ap_uLDelKFaSwXK/images/step-15.png?fit=max&auto=format&n=2Ap_uLDelKFaSwXK&q=85&s=2a10f5cf6e02ecb2a097bff47dfaa7e1" alt="Step 15" width="1400" height="798" data-path="images/step-15.png" />
    </Frame>
  </Step>

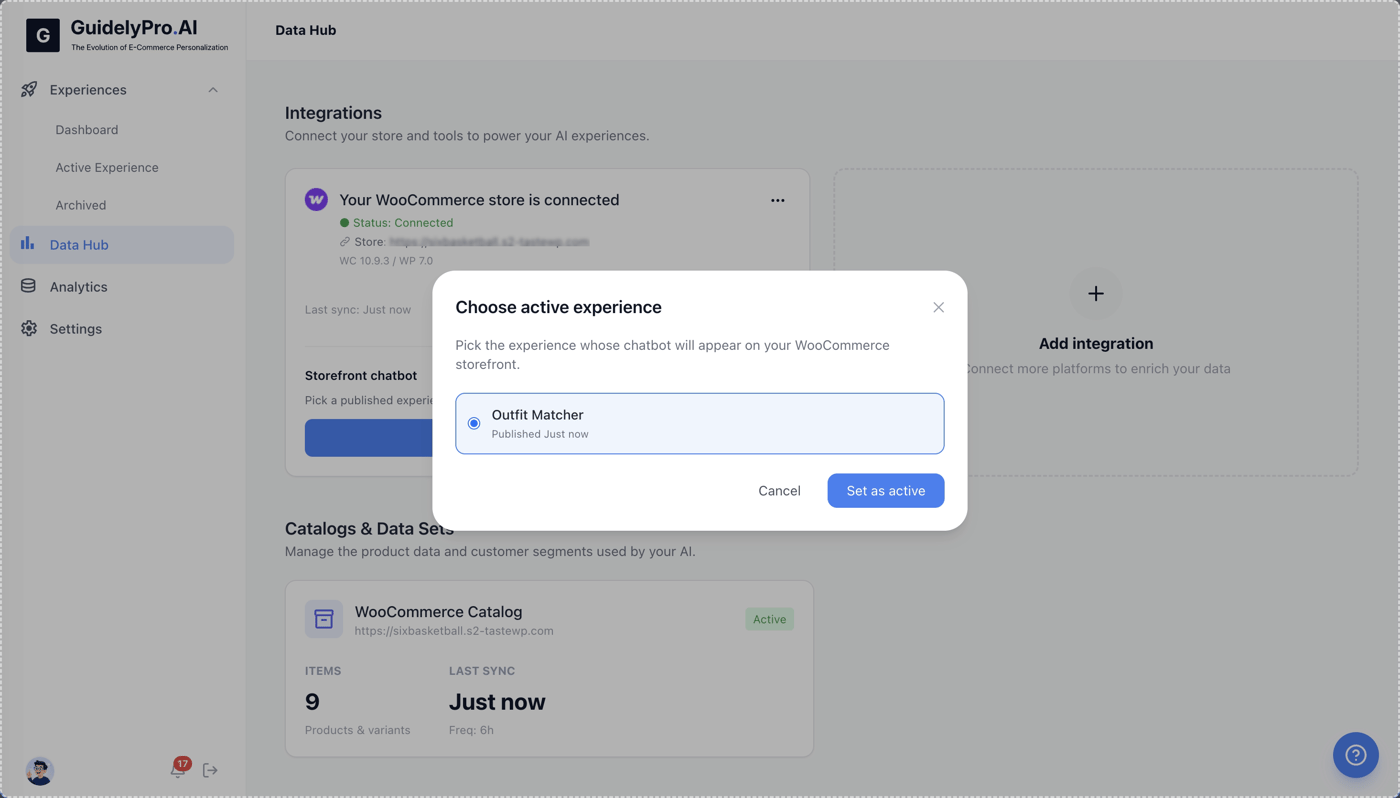
  <Step title="Select the experience">
    Select the experience you want to run on your storefront — here, the Outfit Matcher.
    <Frame>
      <img src="https://mintcdn.com/guidelypro/2Ap_uLDelKFaSwXK/images/step-16.png?fit=max&auto=format&n=2Ap_uLDelKFaSwXK&q=85&s=d572ad018260dff9c0e09a5acbd76065" alt="Step 16" width="1400" height="798" data-path="images/step-16.png" />
    </Frame>
  </Step>

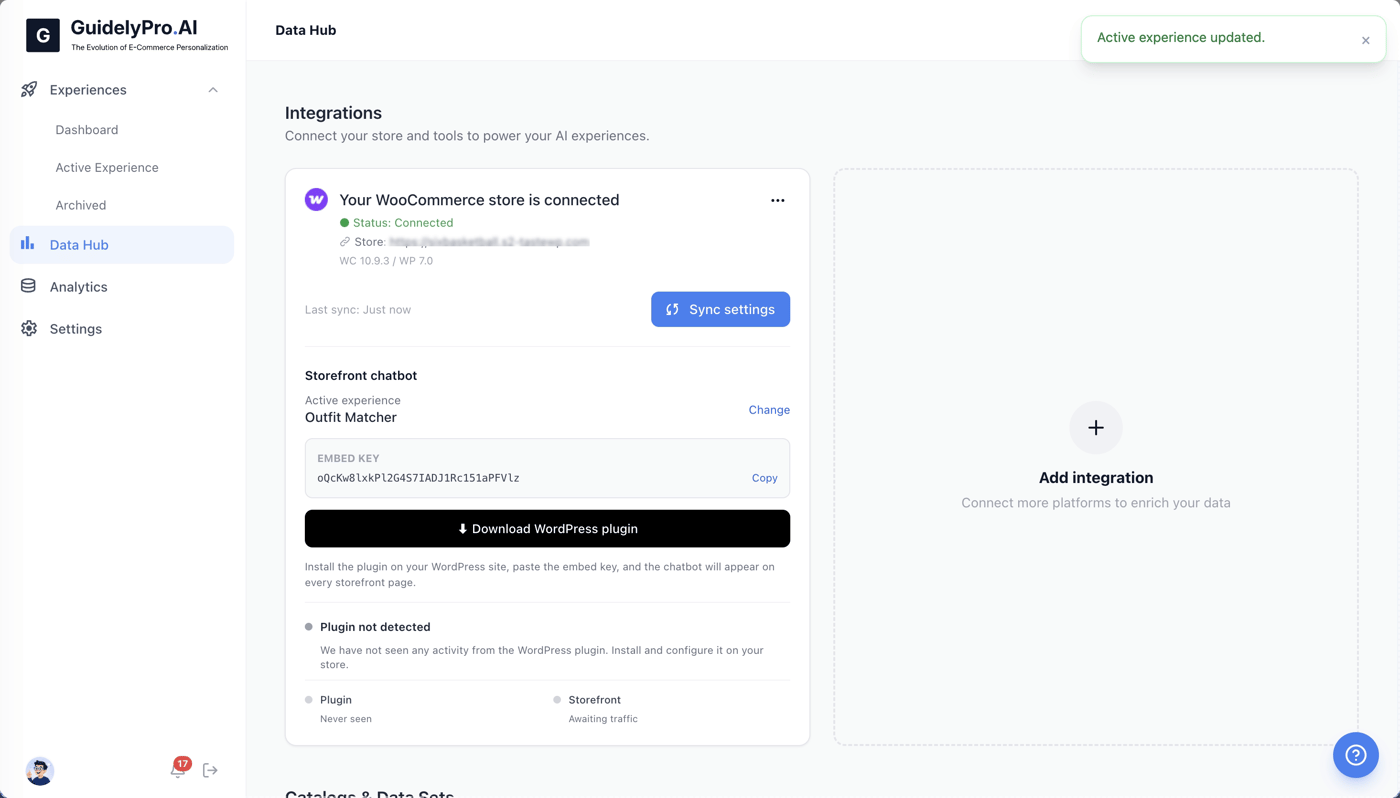
  <Step title="Set as active">
    Click **Set as active** to confirm this experience for your WooCommerce store.
    <Frame>
      <img src="https://mintcdn.com/guidelypro/2Ap_uLDelKFaSwXK/images/step-17.png?fit=max&auto=format&n=2Ap_uLDelKFaSwXK&q=85&s=da39a847141bbd17065a3d482ff96cda" alt="Step 17" width="1400" height="798" data-path="images/step-17.png" />
    </Frame>
  </Step>
</Steps>

## Part 4 — Install the WordPress plugin

<Tip>
  WooCommerce runs on WordPress, so unlike hosted platforms the storefront activation happens through a lightweight WordPress plugin plus an embed key. Download, upload, activate — three clicks.
</Tip>

<Steps>
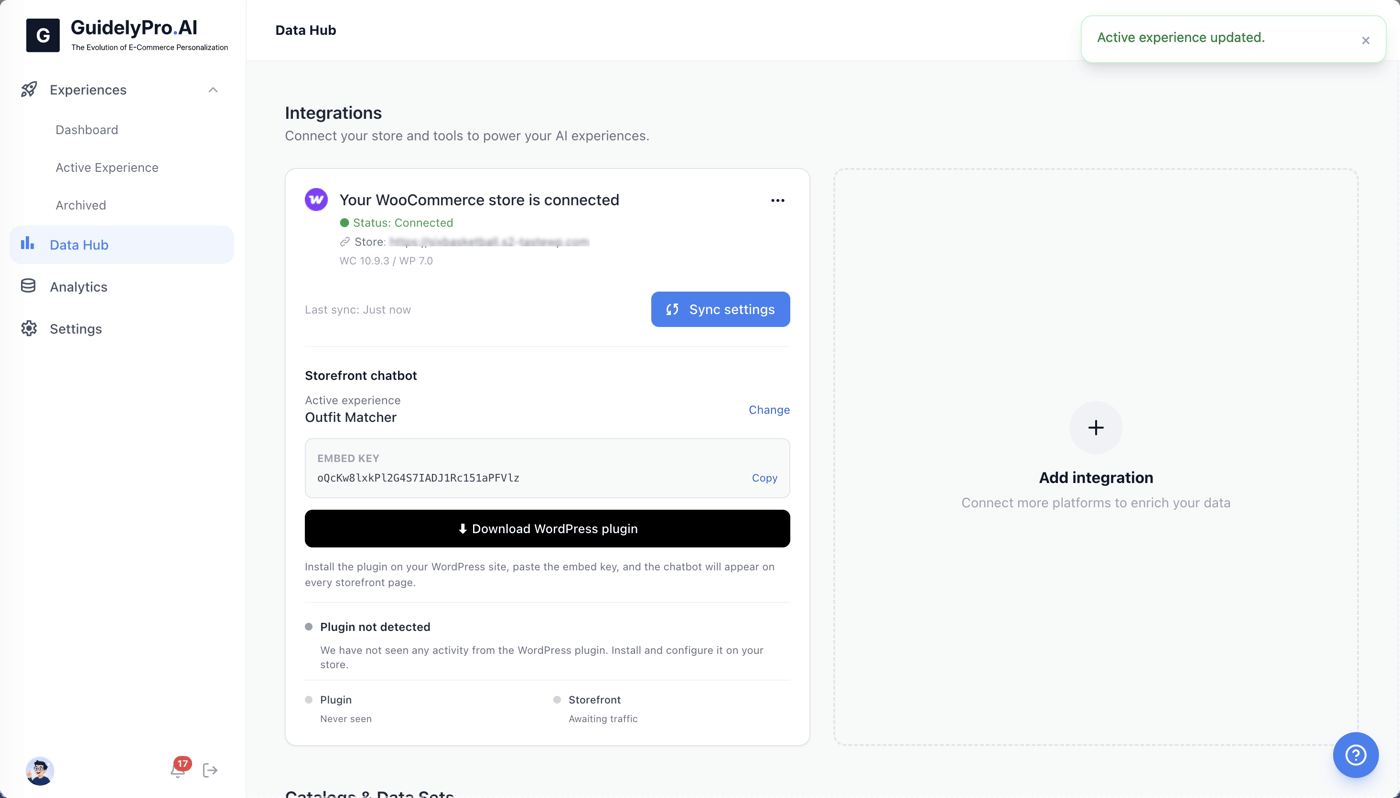
  <Step title="Download the plugin">
    Download the WordPress plugin to enable your conversion engine experience on your storefront.
    <Frame>
      <img src="https://mintcdn.com/guidelypro/2Ap_uLDelKFaSwXK/images/step-17-1.png?fit=max&auto=format&n=2Ap_uLDelKFaSwXK&q=85&s=0b262bede116e51e1f223140aab4f714" alt="Step 17 1" width="1400" height="798" data-path="images/step-17-1.png" />
    </Frame>
  </Step>

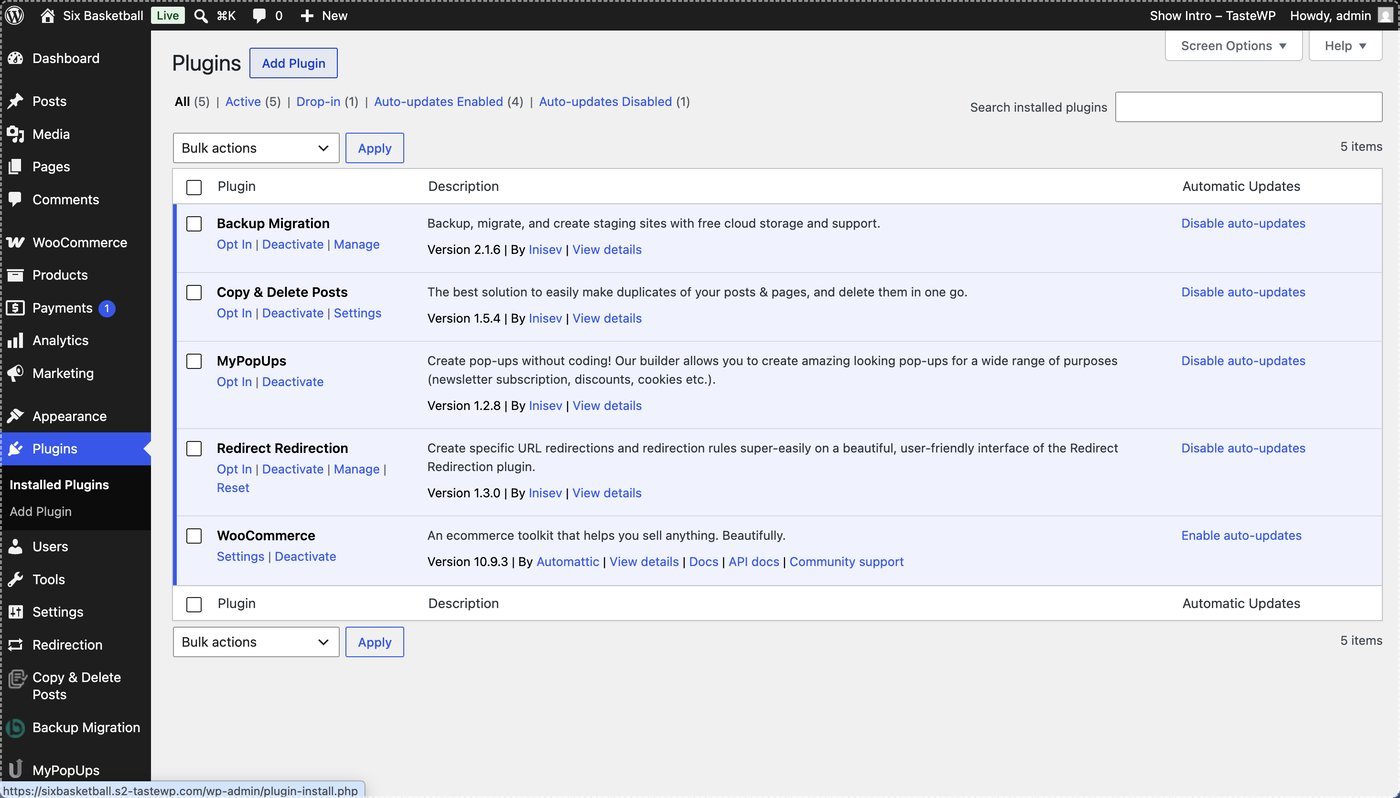
  <Step title="Open Plugins in WordPress">
    Open the **Plugins** section in WordPress to manage existing plugins.
    <Frame>
      <img src="https://mintcdn.com/guidelypro/2Ap_uLDelKFaSwXK/images/step-19-1.jpg?fit=max&auto=format&n=2Ap_uLDelKFaSwXK&q=85&s=cd758fa2811fb1cbb03a28f8b458df14" alt="Step 18 2" width="1400" height="798" data-path="images/step-19-1.jpg" />
    </Frame>
  </Step>

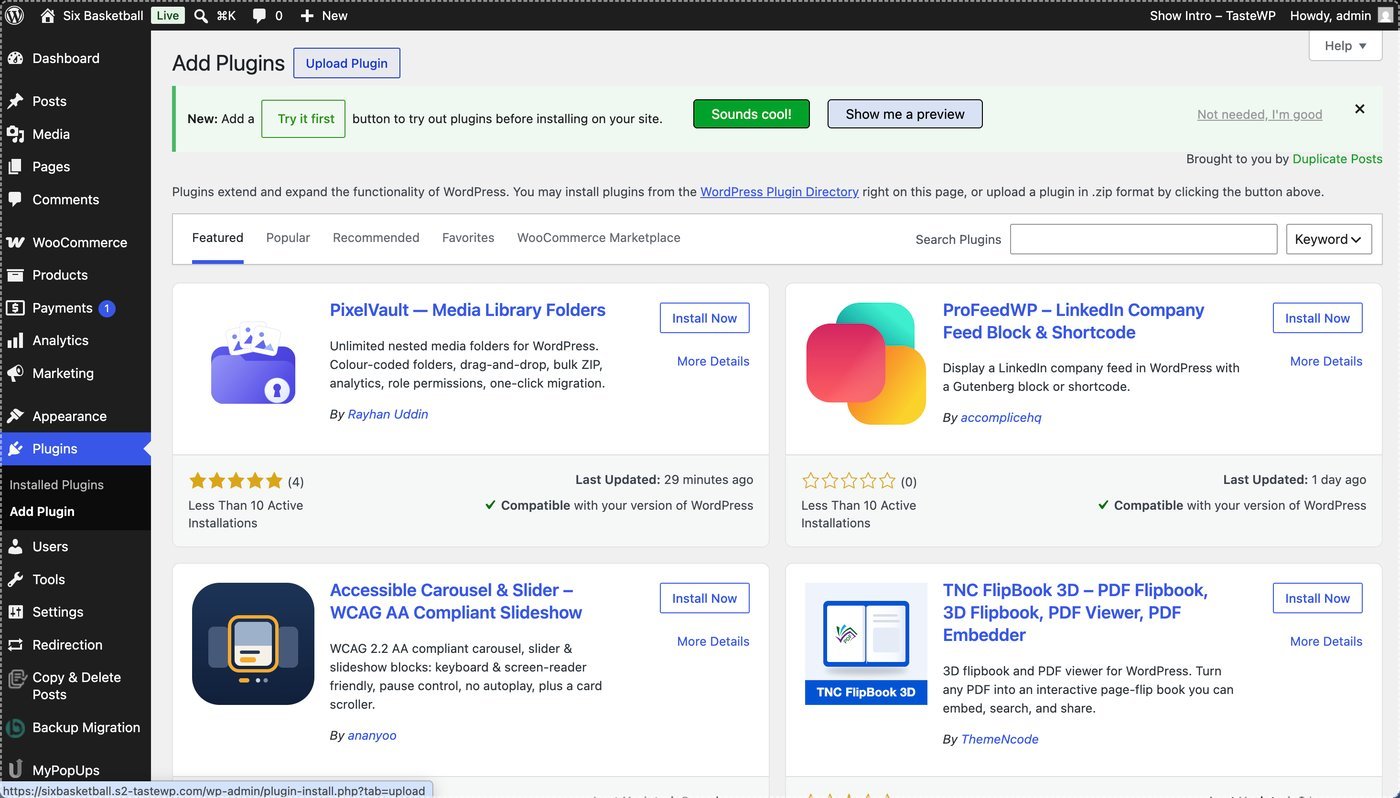
  <Step title="Add a plugin">
    Click **Add Plugin** to upload a new plugin for your site.
    <Frame>
      <img src="https://mintcdn.com/guidelypro/2Ap_uLDelKFaSwXK/images/step-20-1.jpg?fit=max&auto=format&n=2Ap_uLDelKFaSwXK&q=85&s=a444a8207b74f258aa089c7bc4d34460" alt="Step 20 1" width="1400" height="798" data-path="images/step-20-1.jpg" />
    </Frame>
  </Step>

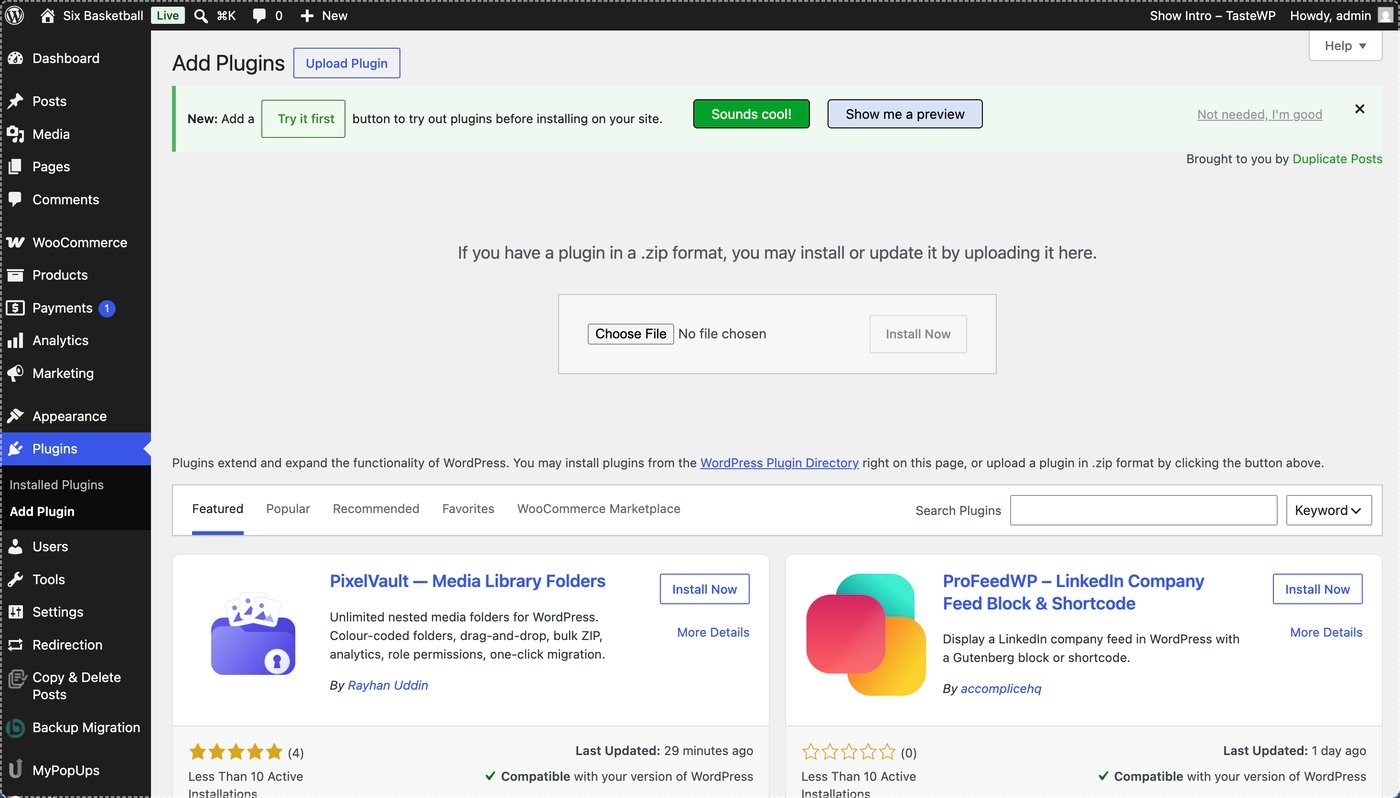
  <Step title="Upload the plugin">
    Select **Upload Plugin** to add the plugin you just downloaded from GuidelyPro.AI.
    <Frame>
      <img src="https://mintcdn.com/guidelypro/2Ap_uLDelKFaSwXK/images/step-21-1.jpg?fit=max&auto=format&n=2Ap_uLDelKFaSwXK&q=85&s=01608703914f85d86b11866b4b74be94" alt="Step 21 1" width="1400" height="798" data-path="images/step-21-1.jpg" />
    </Frame>
  </Step>

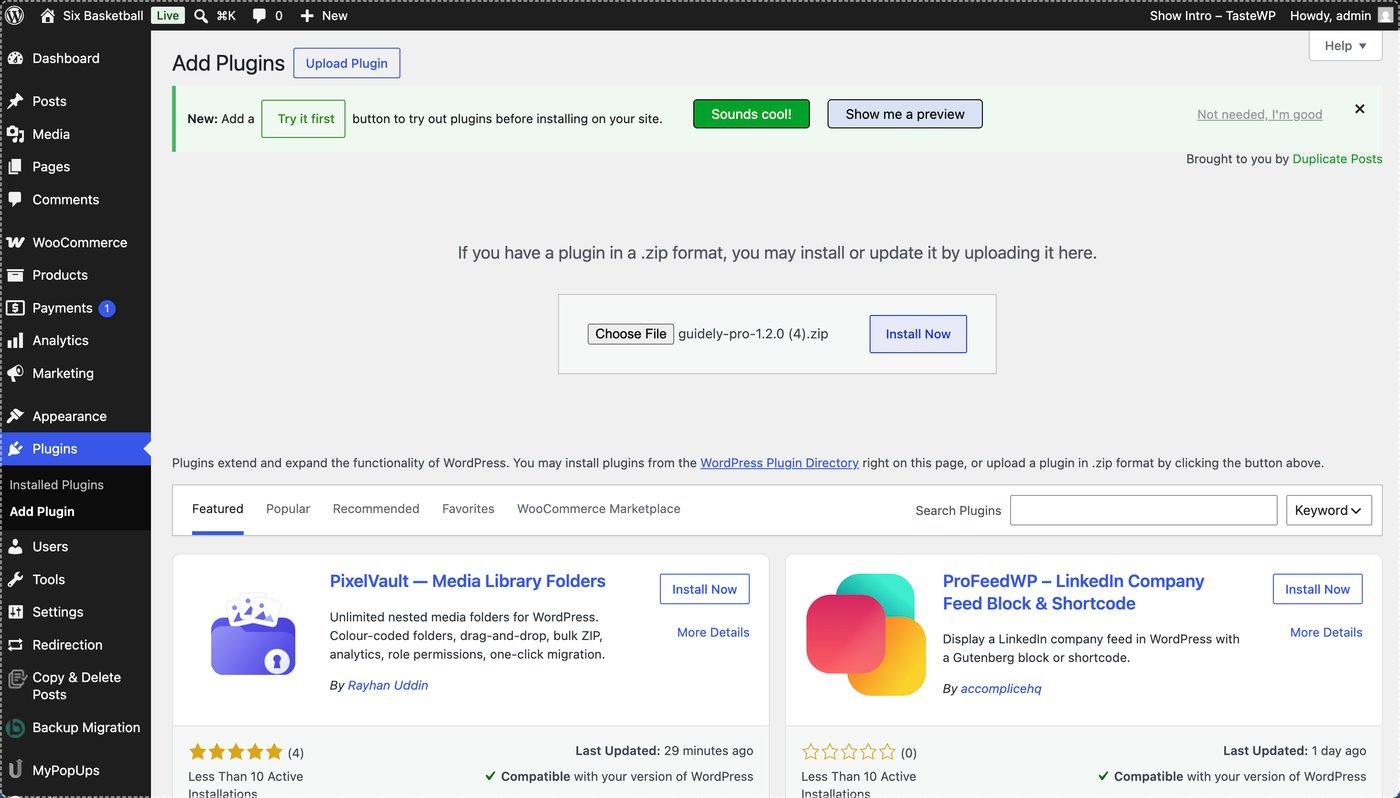
  <Step title="Choose the ZIP file">
    Click **Choose File** and select the plugin ZIP file from your computer.
    <Frame>
      <img src="https://mintcdn.com/guidelypro/2Ap_uLDelKFaSwXK/images/step-22-1.jpg?fit=max&auto=format&n=2Ap_uLDelKFaSwXK&q=85&s=fbe48c563fe86d2e5b52a5956e212c25" alt="Step 22 1" width="1400" height="798" data-path="images/step-22-1.jpg" />
    </Frame>
  </Step>

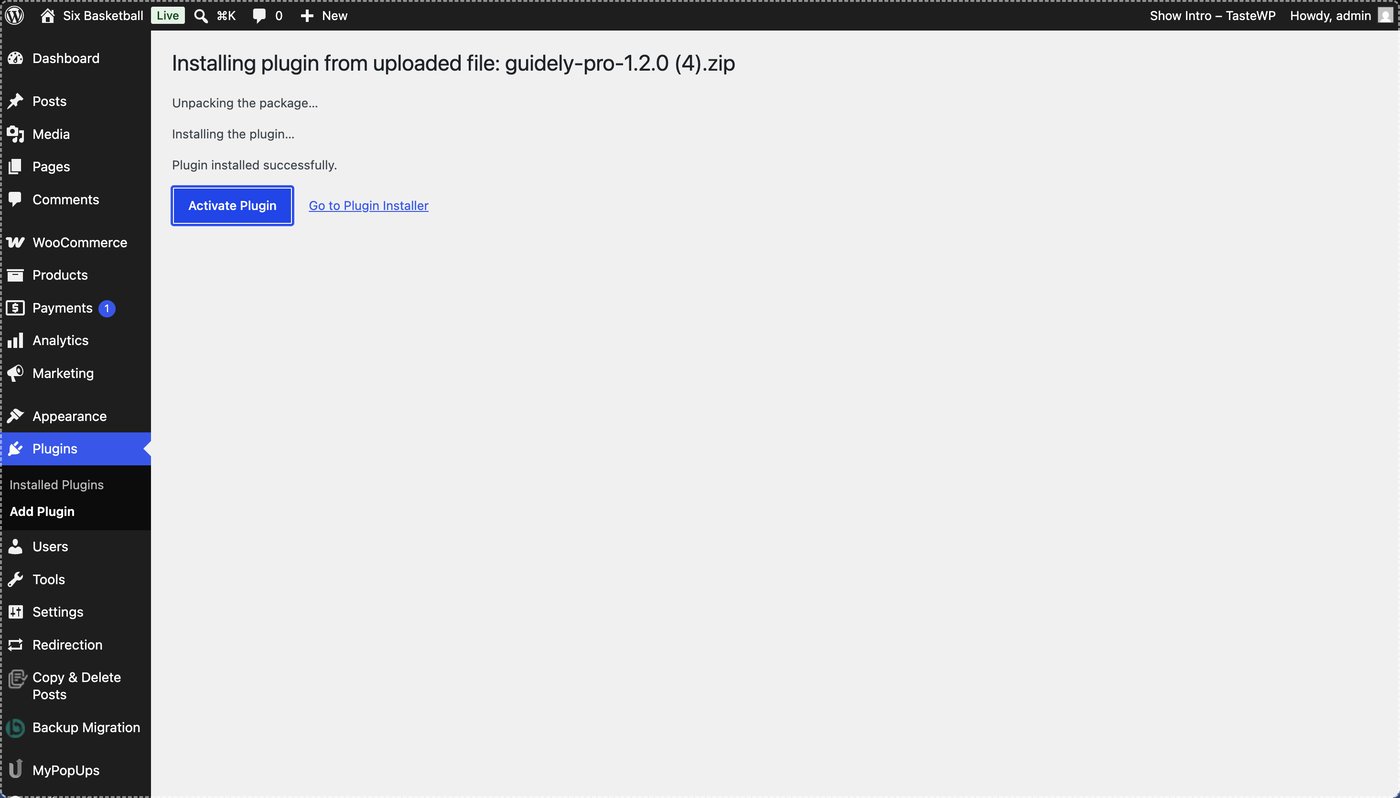
  <Step title="Install">
    Click **Install Now** to upload and install the GuidelyPro.AI plugin to your WordPress setup.
    <Frame>
      <img src="https://mintcdn.com/guidelypro/2Ap_uLDelKFaSwXK/images/step-23-1.jpg?fit=max&auto=format&n=2Ap_uLDelKFaSwXK&q=85&s=d57421747d185dafaffbfd6550851722" alt="Step 23 1" width="1400" height="798" data-path="images/step-23-1.jpg" />
    </Frame>
  </Step>

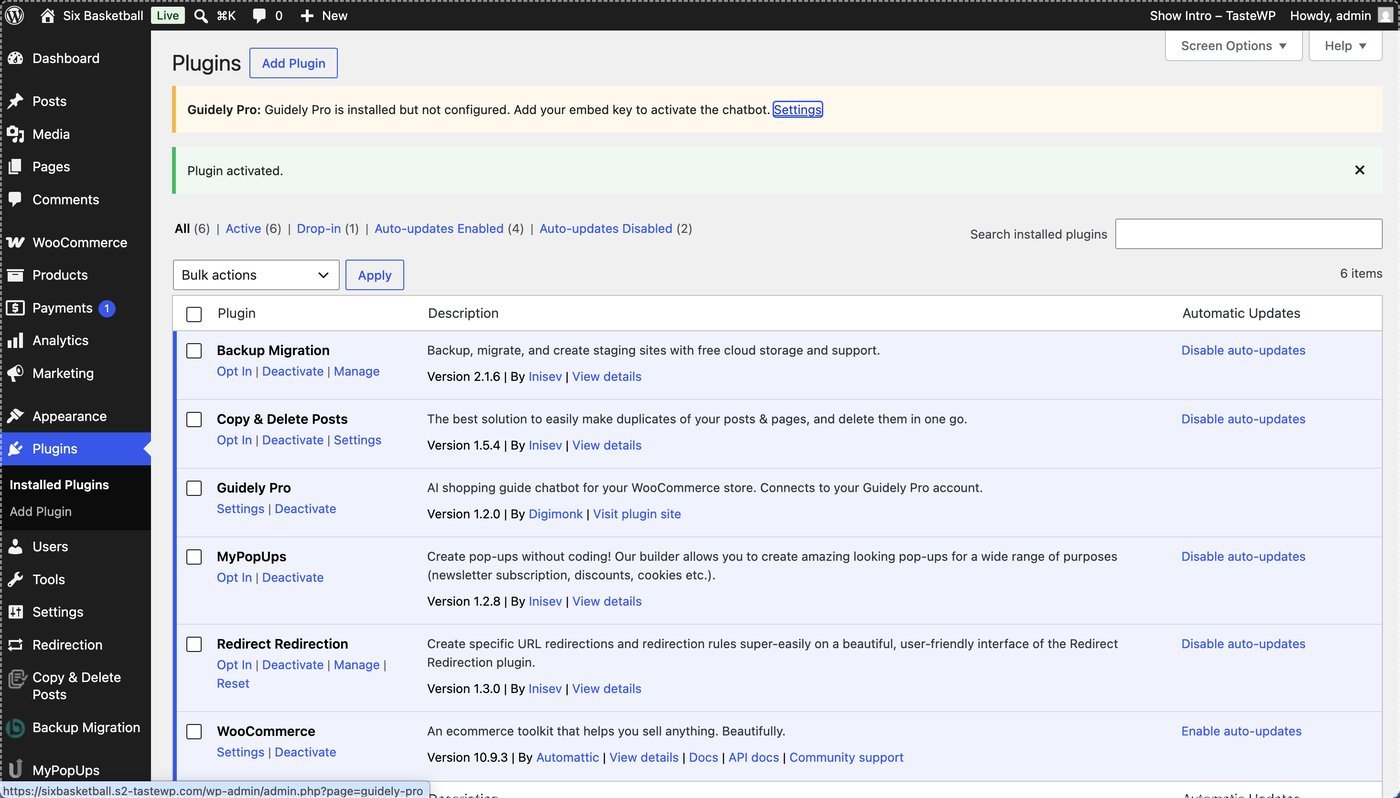
  <Step title="Activate">
    Activate the plugin to enable GuidelyPro.AI features on your WordPress site.
    <Frame>
      <img src="https://mintcdn.com/guidelypro/2Ap_uLDelKFaSwXK/images/step-24.jpg?fit=max&auto=format&n=2Ap_uLDelKFaSwXK&q=85&s=180fee722acc278755a7f6083ed14c29" alt="Step 24" width="1400" height="798" data-path="images/step-24.jpg" />
    </Frame>
  </Step>
</Steps>

## Part 5 — Activate and verify the chatbot

<Steps>
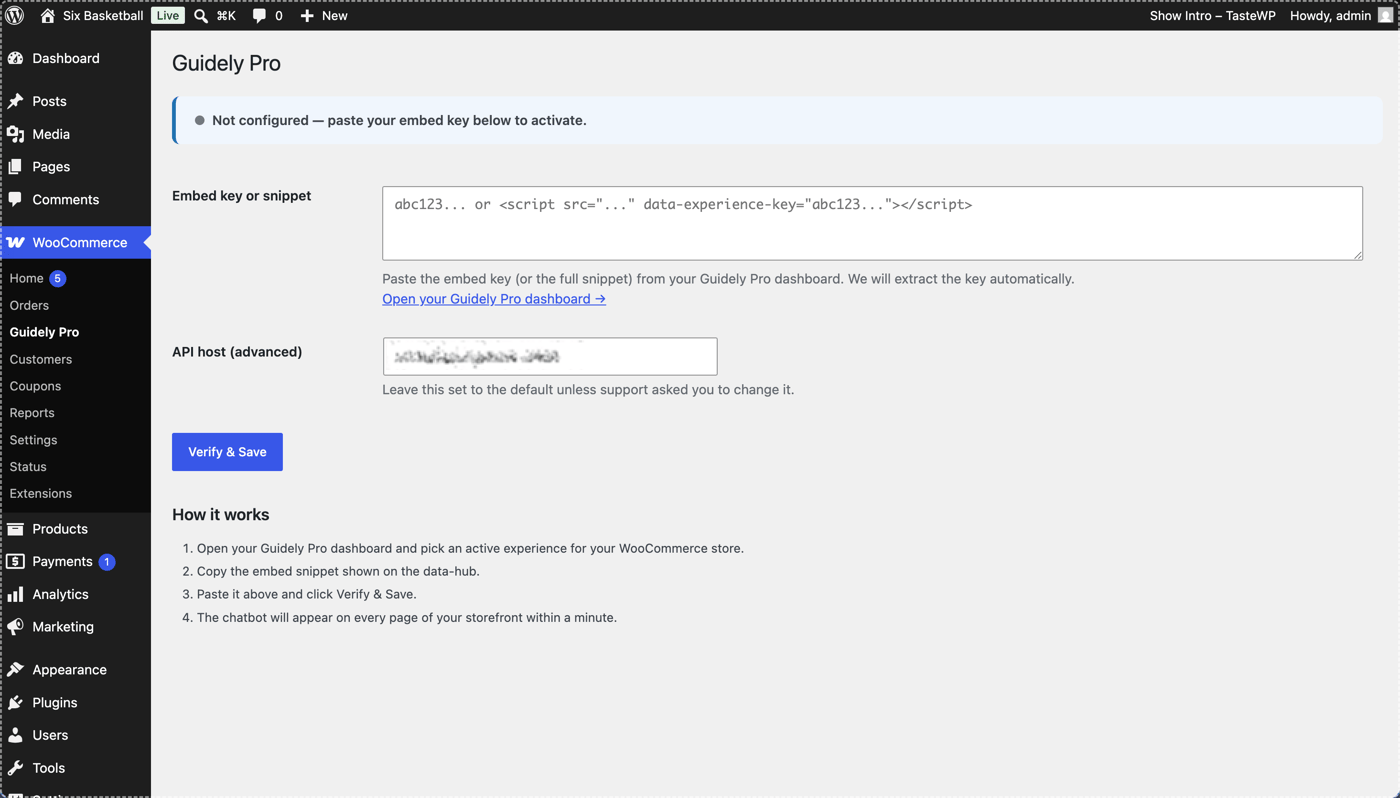
  <Step title="Open the plugin settings">
    Open the settings for the GuidelyPro.AI plugin to begin configuration and activation.
    <Frame>
      <img src="https://mintcdn.com/guidelypro/2Ap_uLDelKFaSwXK/images/step-25.png?fit=max&auto=format&n=2Ap_uLDelKFaSwXK&q=85&s=9afa626bc418938de7788e1c4a4ed3e6" alt="Step 25" width="1400" height="798" data-path="images/step-25.png" />
    </Frame>
  </Step>

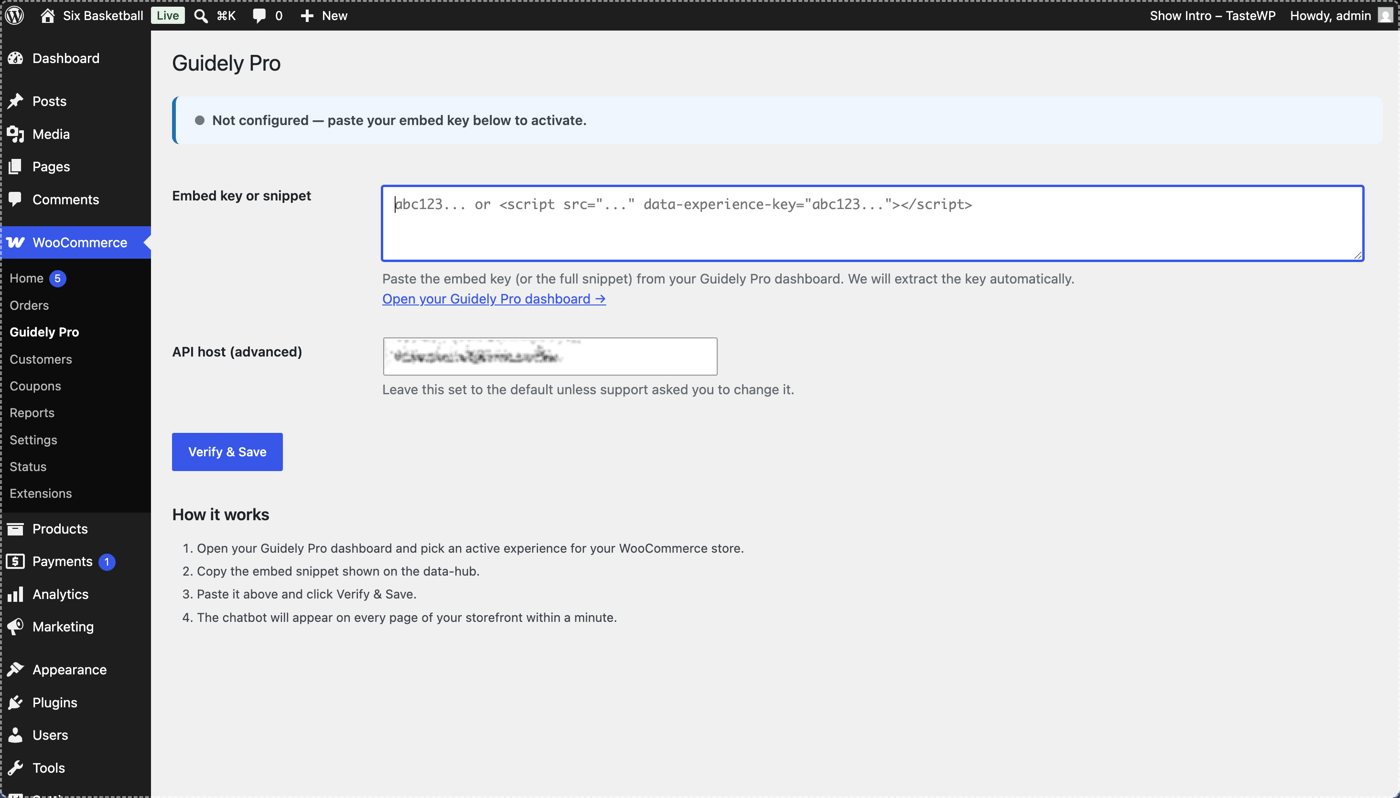
  <Step title="Go to the integration settings">
    Go to **WooCommerce** in your WordPress menu to access the GuidelyPro.AI integration settings.
    <Frame>
      <img src="https://mintcdn.com/guidelypro/2Ap_uLDelKFaSwXK/images/step-27.png?fit=max&auto=format&n=2Ap_uLDelKFaSwXK&q=85&s=5acf0a3886094b722782dfd00025b9f1" alt="Step 27" width="1400" height="798" data-path="images/step-27.png" />
    </Frame>
  </Step>

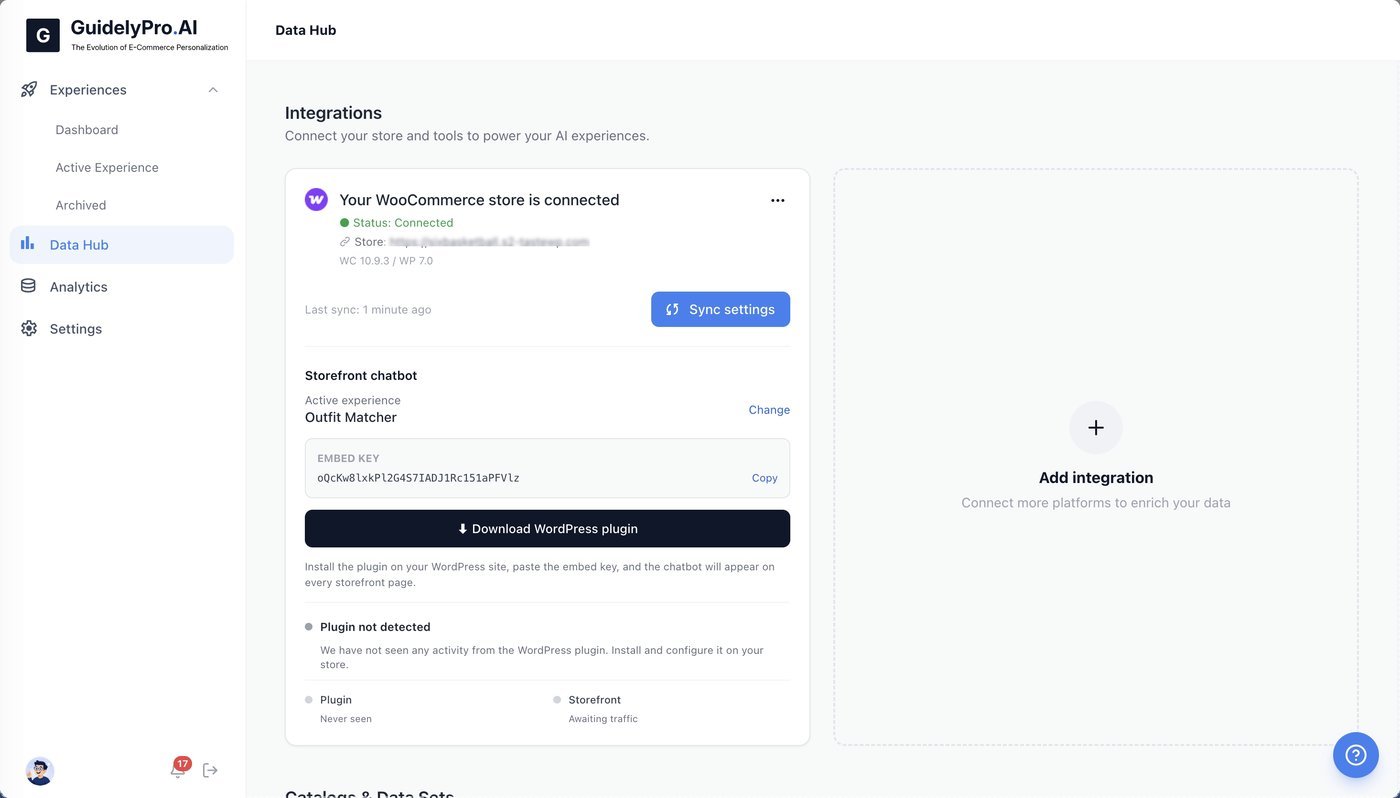
  <Step title="Copy your embed key">
    Copy your **embed key** — it activates the conversion engine plugin on your web store.
    <Frame>
      <img src="https://mintcdn.com/guidelypro/2Ap_uLDelKFaSwXK/images/step-29.jpg?fit=max&auto=format&n=2Ap_uLDelKFaSwXK&q=85&s=0cbb5b9caafc02e83388ebd5eaaab6c3" alt="Step 29" width="1400" height="798" data-path="images/step-29.jpg" />
    </Frame>
  </Step>

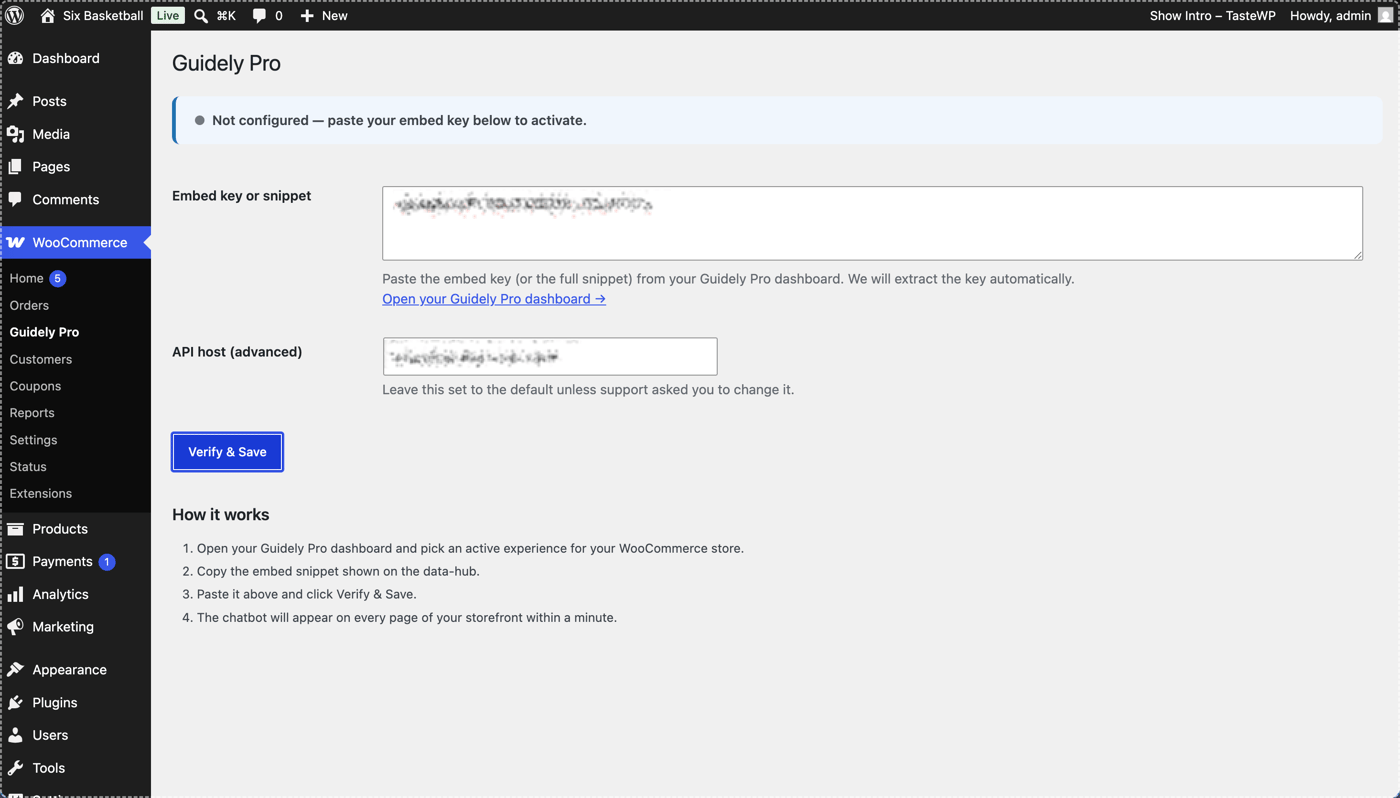
  <Step title="Paste the embed key">
    Paste the embed key into the designated field to connect GuidelyPro.AI.
    <Frame>
      <img src="https://mintcdn.com/guidelypro/2Ap_uLDelKFaSwXK/images/step-28.png?fit=max&auto=format&n=2Ap_uLDelKFaSwXK&q=85&s=96182fb2c9562c732a831087a60f730f" alt="Step 28" width="1400" height="798" data-path="images/step-28.png" />
    </Frame>
  </Step>

  <Step title="Verify and save">
    Click **Verify & Save** to activate the plugin integration with your WooCommerce site.

    <Frame>
      <img src="https://mintcdn.com/guidelypro/2Ap_uLDelKFaSwXK/images/step-28.png?fit=max&auto=format&n=2Ap_uLDelKFaSwXK&q=85&s=96182fb2c9562c732a831087a60f730f" alt="Step 30" width="1400" height="798" data-path="images/step-28.png" />
    </Frame>
  </Step>

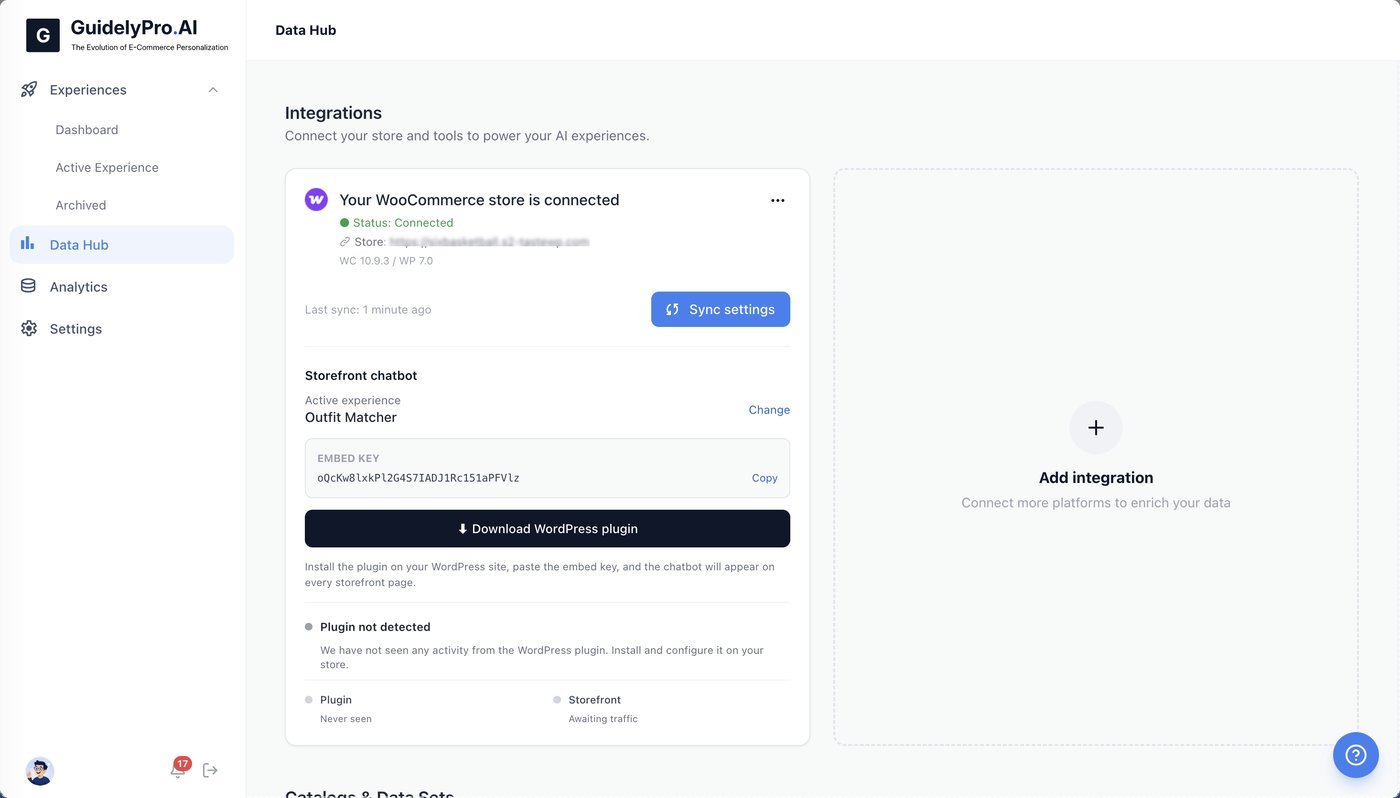
  <Step title="Sync settings">
    Use **Sync settings** to update or verify your store connection and make sure your chatbot is working.
    <Frame>
      <img src="https://mintcdn.com/guidelypro/2Ap_uLDelKFaSwXK/images/step-29-1.jpg?fit=max&auto=format&n=2Ap_uLDelKFaSwXK&q=85&s=c03907cec0e738b6602b2bfdc5884c13" alt="Step 30 1" width="1400" height="798" data-path="images/step-29-1.jpg" />
    </Frame>
  </Step>

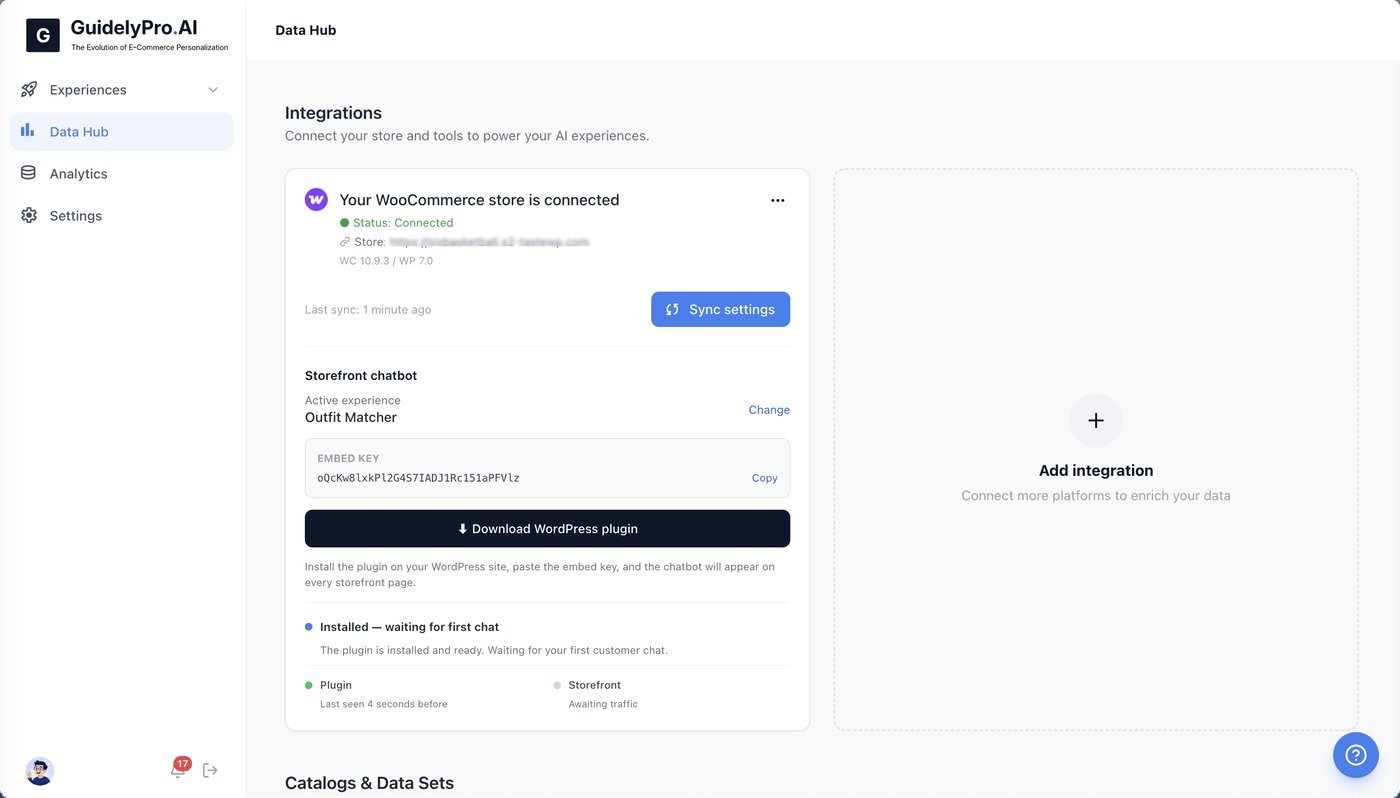
  <Step title="Check the Data Hub">
    Return to the **Data Hub** to view all active integrations and manage store connections.
    <Frame>
      <img src="https://mintcdn.com/guidelypro/2Ap_uLDelKFaSwXK/images/step-30-2.jpg?fit=max&auto=format&n=2Ap_uLDelKFaSwXK&q=85&s=a5f207b17daa4ffce73b0cf633a7d4b2" alt="Step 30 2" width="1400" height="798" data-path="images/step-30-2.jpg" />
    </Frame>
  </Step>

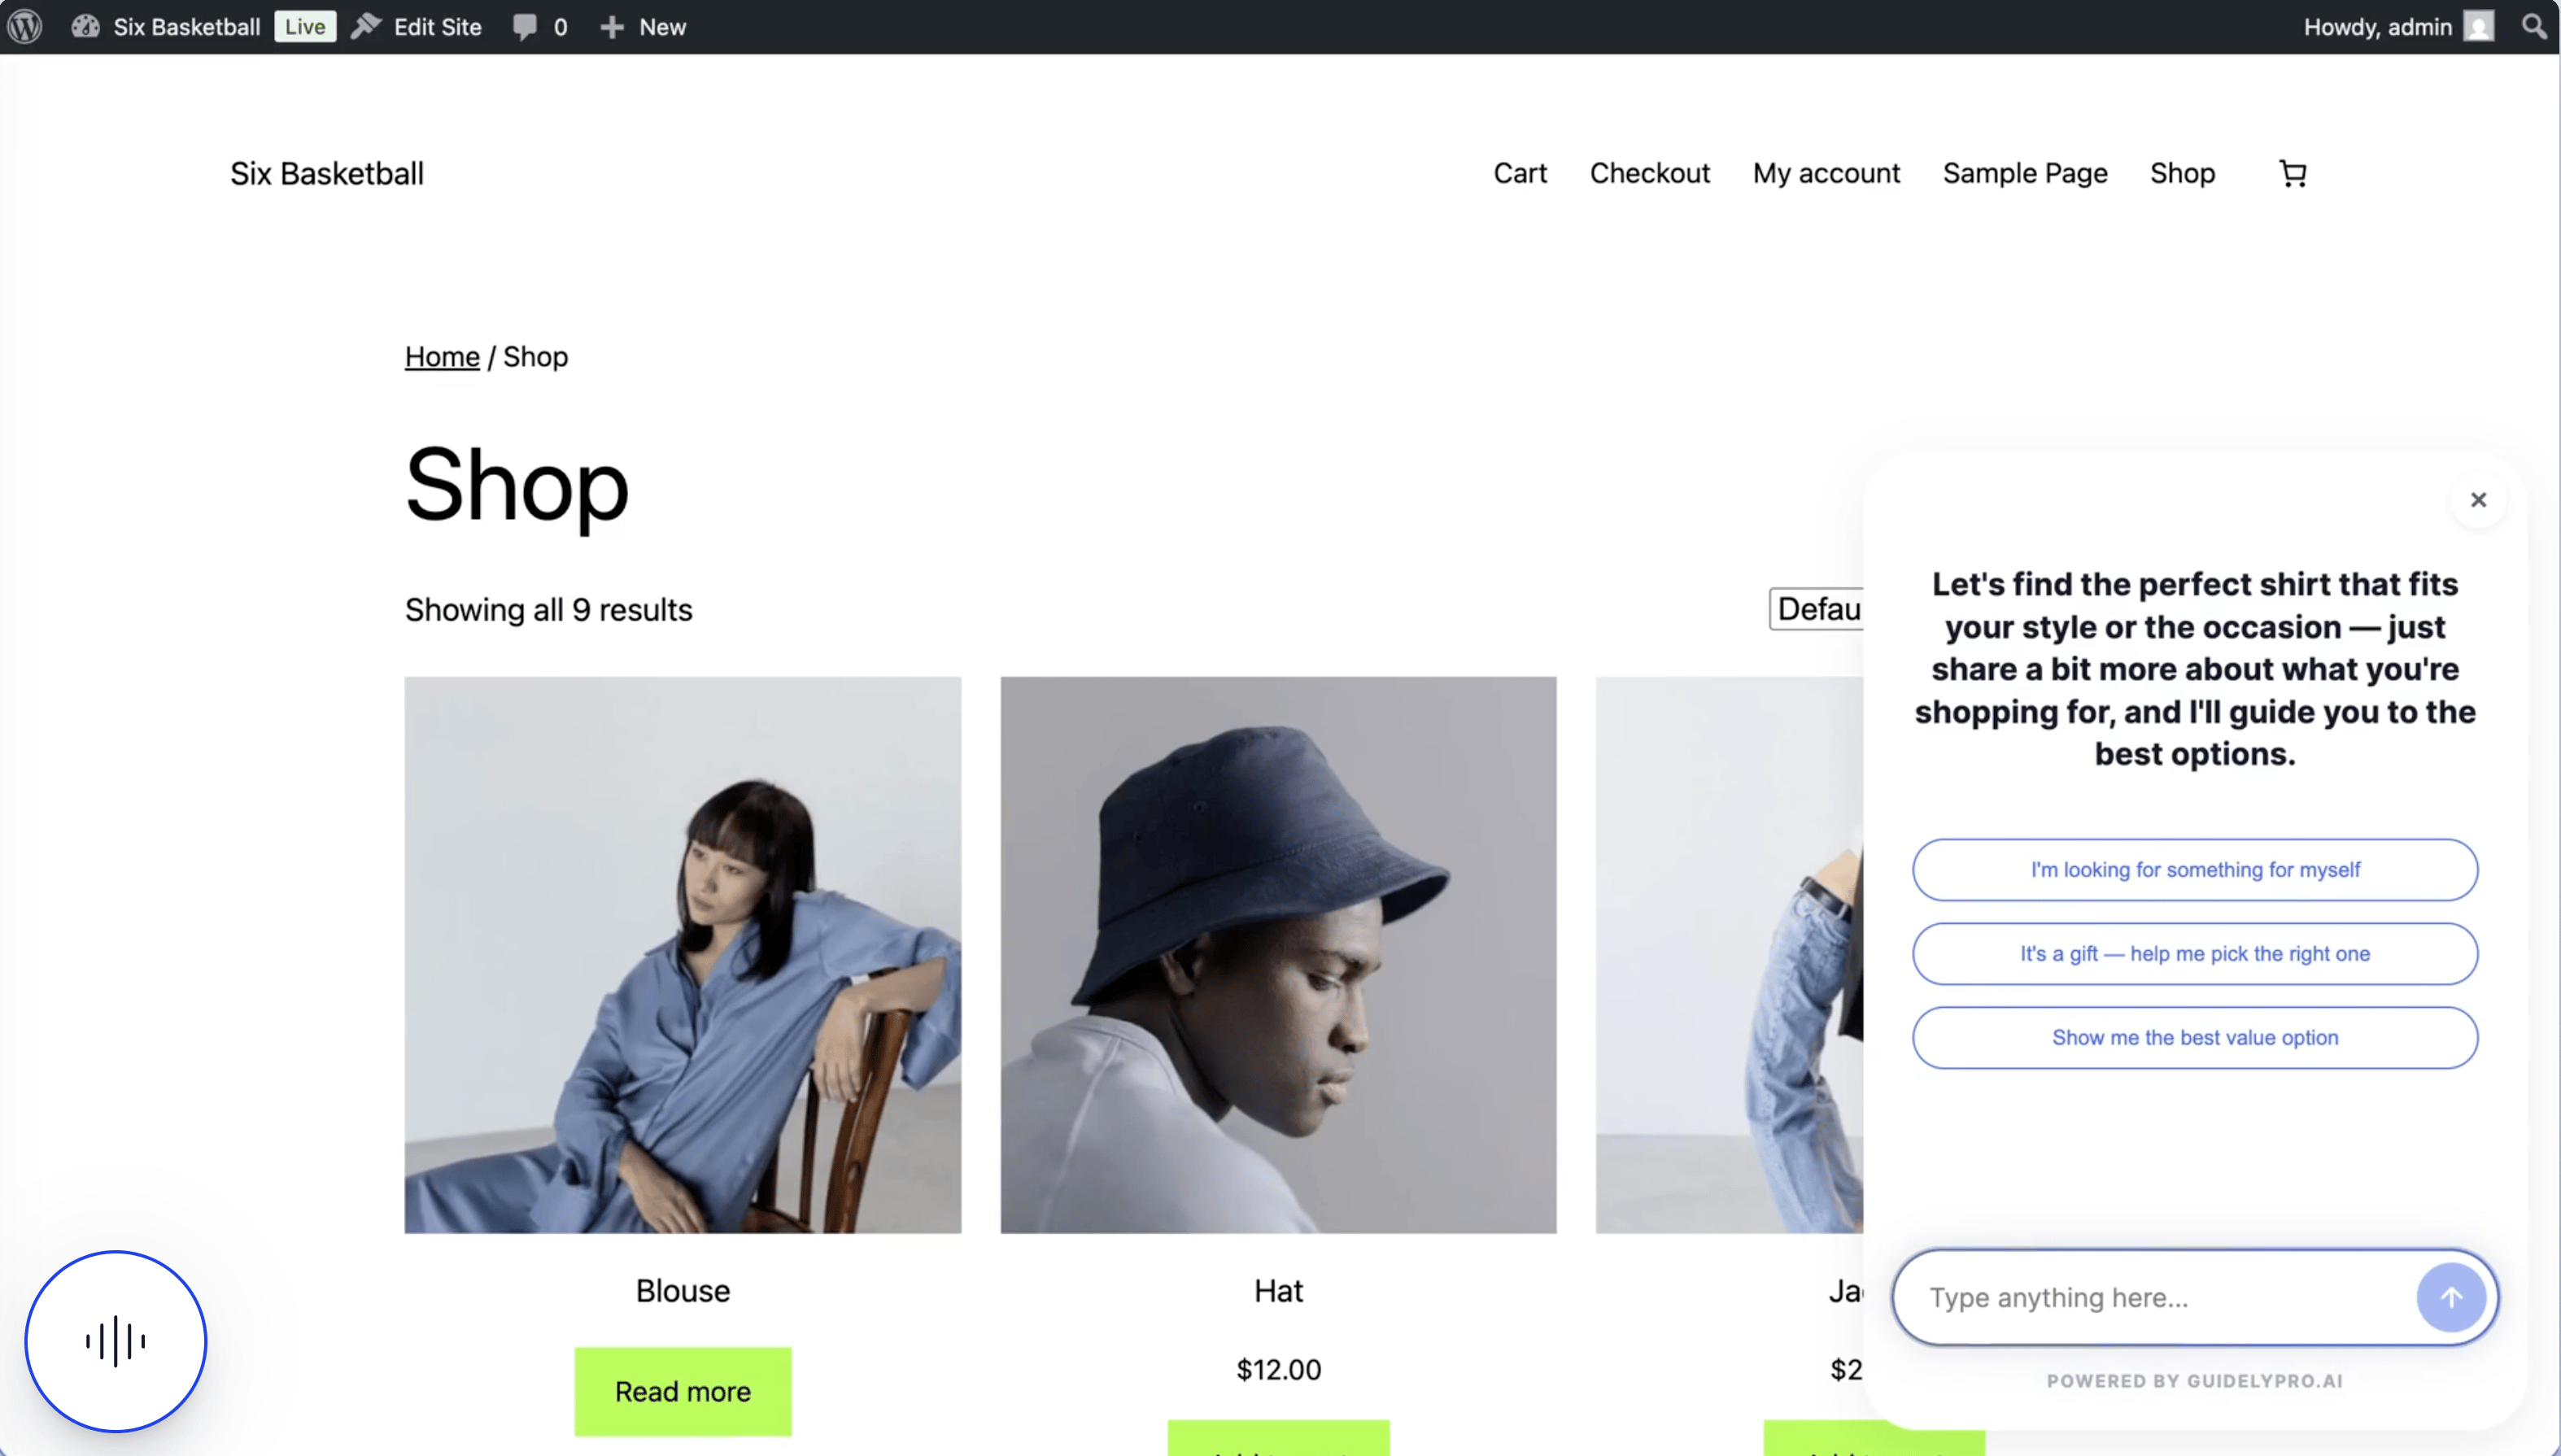
  <Step title="Test it on your storefront">
    Test the experience on your storefront.
    <Frame>
      <img src="https://mintcdn.com/guidelypro/2Ap_uLDelKFaSwXK/images/Screenshot-2026-07-07-at-22.28.36.png?fit=max&auto=format&n=2Ap_uLDelKFaSwXK&q=85&s=263f46b0e82c7975d39d09e377f66651" alt="Screenshot 2026 07 07 At 22 28 36" width="3148" height="1790" data-path="images/Screenshot-2026-07-07-at-22.28.36.png" />
    </Frame>
  </Step>
</Steps>

## That's it

Your WooCommerce store now runs a guided experience built on your real product catalog — shoppers get guided to the right product instead of browsing past it.